ProNextJS
    Loading
    lesson

    Intro to Server Actions

    Jack HerringtonJack Herrington

    In the next section, we'll begin building the ChatGPT integration into our application. When a user submits a question, we'll need to send that question to ChatGPT to receive a response from the AI.

    While you could call ChatGPT directly from the client, this would expose our OpenAI token. Another option would be making an API route, which App Router supports. However, there's a new option.

    Server actions are a new feature and fundamental part of the App Router. They provide a way for the client to communicate with the server without exposing sensitive information like API tokens. Before we use server actions in our app, let's experiment with them in a test app.

    Creating a Simple To-do List App

    Run the following command to create a new app, and take all the installation defaults:

    pnpm dlx create-next-app@latest --use-pnpm server-actions
    

    Once the app is created, open the page.tsx file and remove the boilerplate code.

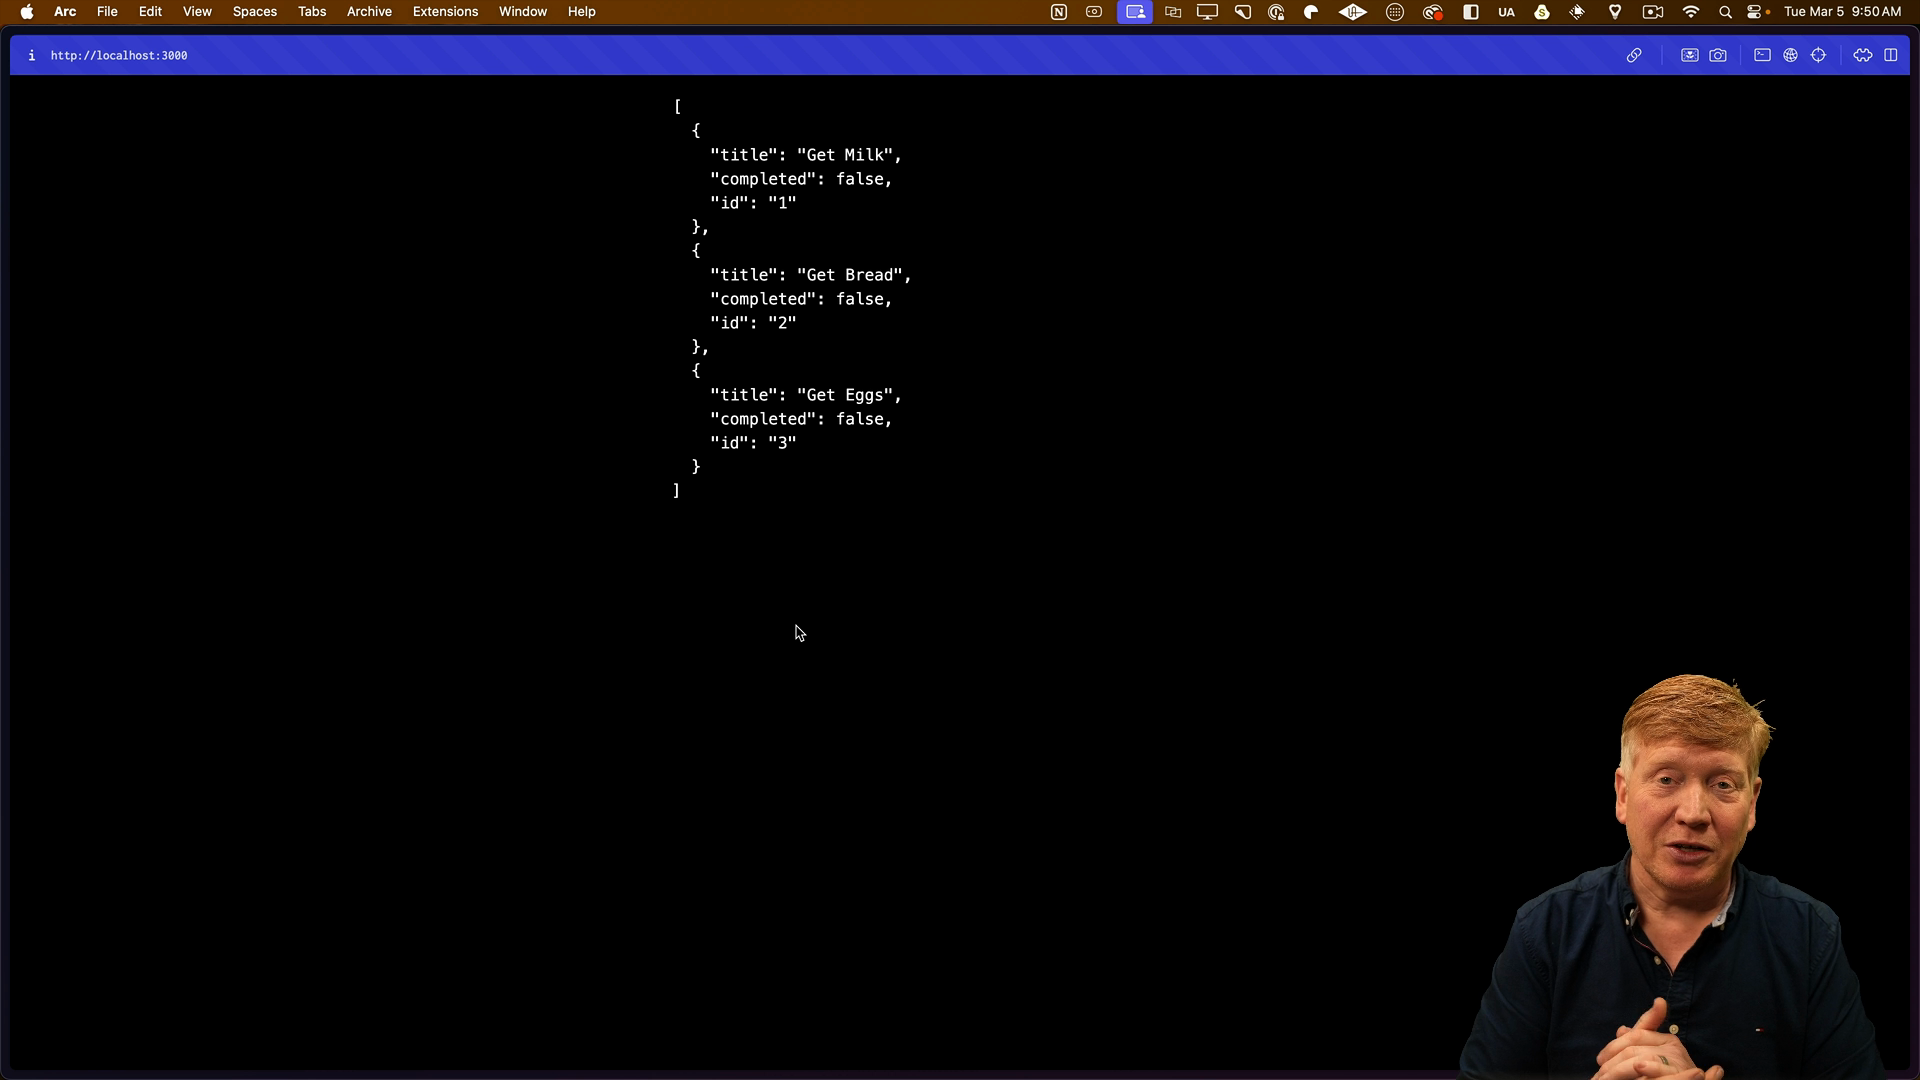
    Next, create a todos.json file that will act as our database. Add some sample to-dos to this file:

    [
      {"title": "Get Milk", "completed": false, "id": "1"},
      {"title": "Get Bread", "completed": false, "id": "2"},
      {"title": "Get Eggs", "completed": false, "id": "3"}
    ]
    

    We'll need to create functions to interact with this database. Create a new file called todos.ts at the top level of the src directory. This is where we'll define a Todo type and add functions to get and add to-dos:

    export interface Todo {
      completed: boolean;
    }
    
    export async function getTodos() {
      const file = await fs.readFile("todos.json", "utf8");
      return JSON.parse(file.toString()) as Todo[];
    }
    
    export async function addTodo(title: string) {
      const todos = await getTodos();
      const newTodo = {
        id: Math.random().toString(36).substring(7),
        title,
        completed: false,
      };
      todos.push(newTodo);
      await fs.writeFile("todos.json", JSON.stringify(todos, null, 2));
    }
    

    The getTodos function reads the todos.json file and returns the parsed JSON data. The addTodo function takes a title, generates a random ID, creates a new to-do object, adds it to the list of to-dos, and writes the updated list back to the file.

    Now, let's test these functions by importing them into the page.tsx file and using them to display and add to-dos. Notice that the import comes from @todos, which is the alias for the src directory:

    // inside page.tsx
    import { getTodos } from "@todos";
    

    Because getTodos is an asynchronous function, we need to add the async keyword to the Home component. For now, we'll just display the todos in the component:

    export default async function Home() {
      const todos = await getTodos();
    
      return <main className="p-5">{JSON.stringify(todos)}</main>;
    }
    

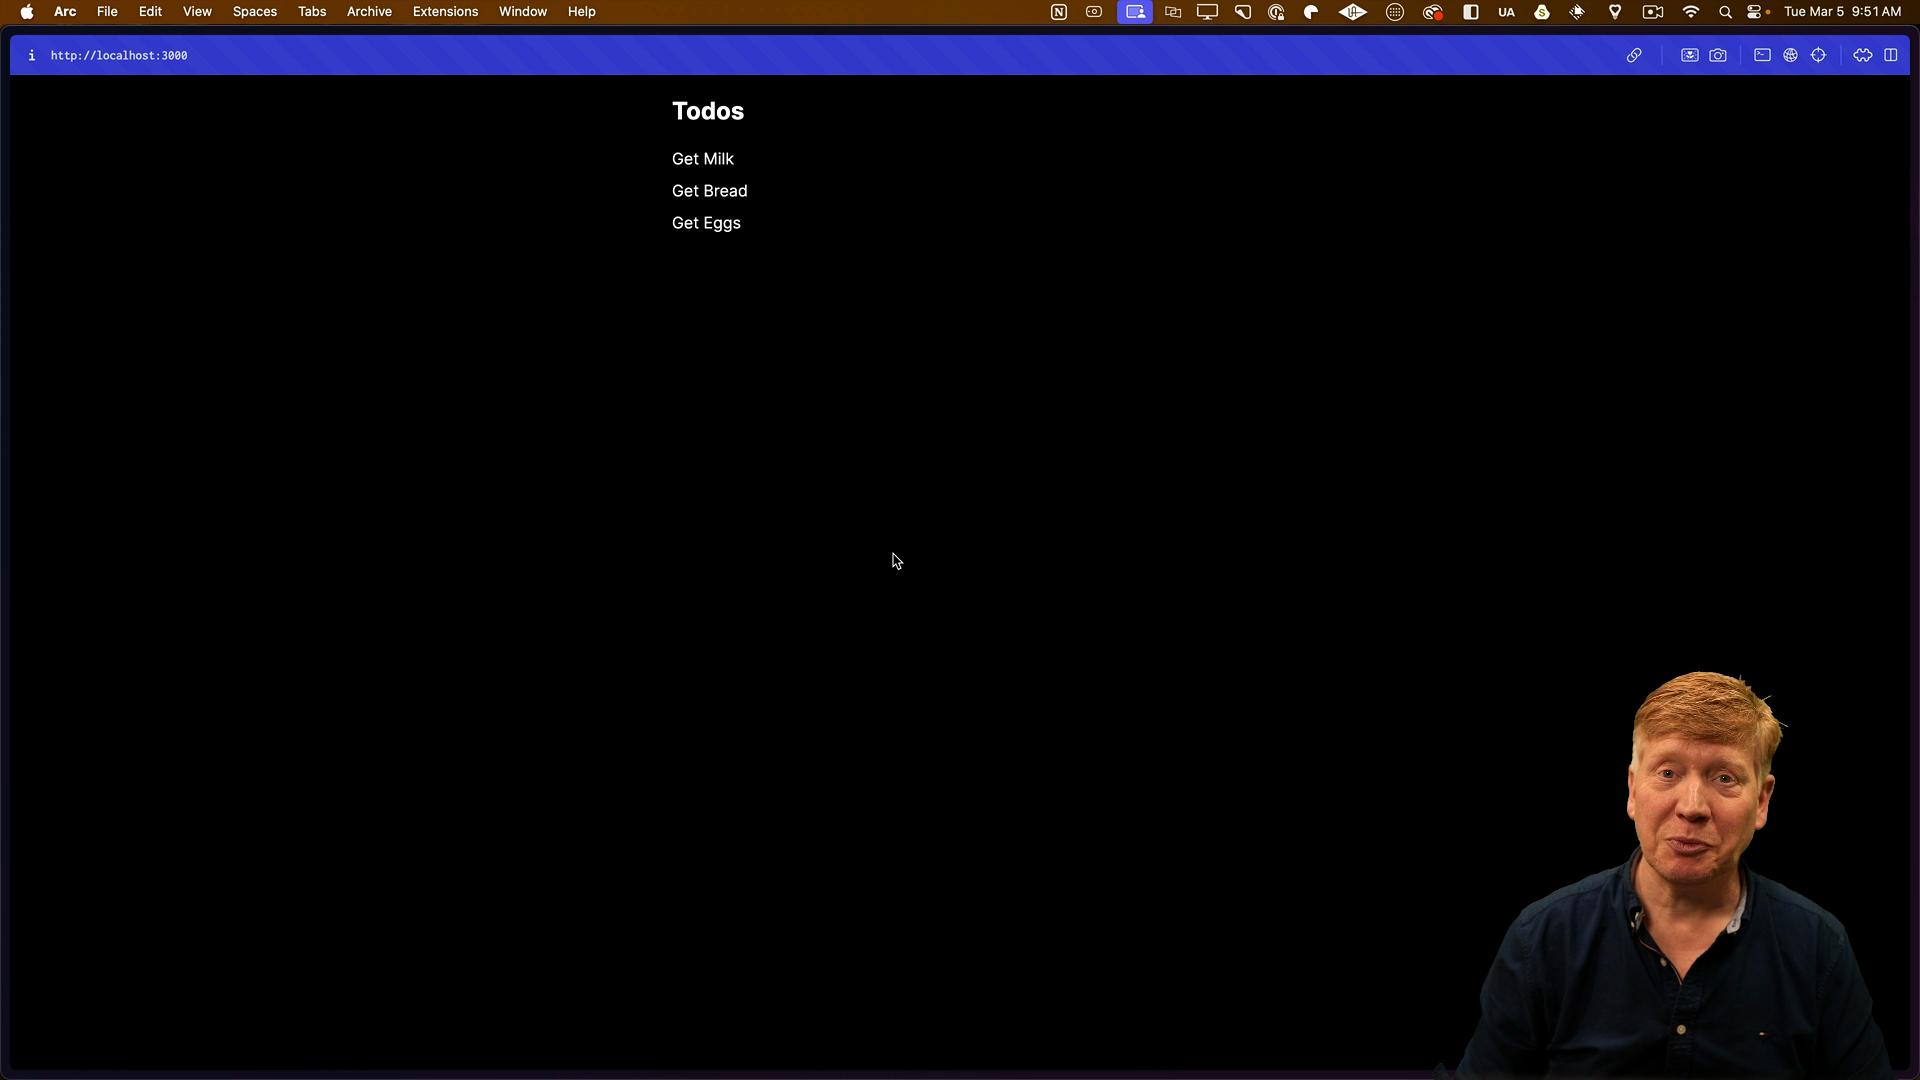
    Run the development server using npm run dev and open the app in your browser. You should see the list of to-dos displayed on the page.

    the todos json is displayed

    Displaying To-Dos in a Client Component

    Create a new file called Todos.tsx in the app directory to define a client component for rendering the to-dos:

    "use client";
    import { Todo } from "@/todos";
    
    export default function Todos({ todos }: { todos: Todo[] }) {
      return (
        <>
          <h2 className="text-2xl font-bold mb-5">Todos</h2>
          <ul>
            {todos.map((todo) => (
              <li key={todo.id} className="mb-2">
                {todo.title}
              </li>
            ))}
          </ul>
        </>
      );
    }
    

    Update the page.tsx file to import and use the Todos component:

    // inside page.tsx
    
    import { Todos } from './Todos';
    import { getTodos } from '@/todos';
    
    export default async function Page() {
      const todos = await getTodos();
    
      return (
        <main className="max-w-xl mx-auto mt-5">
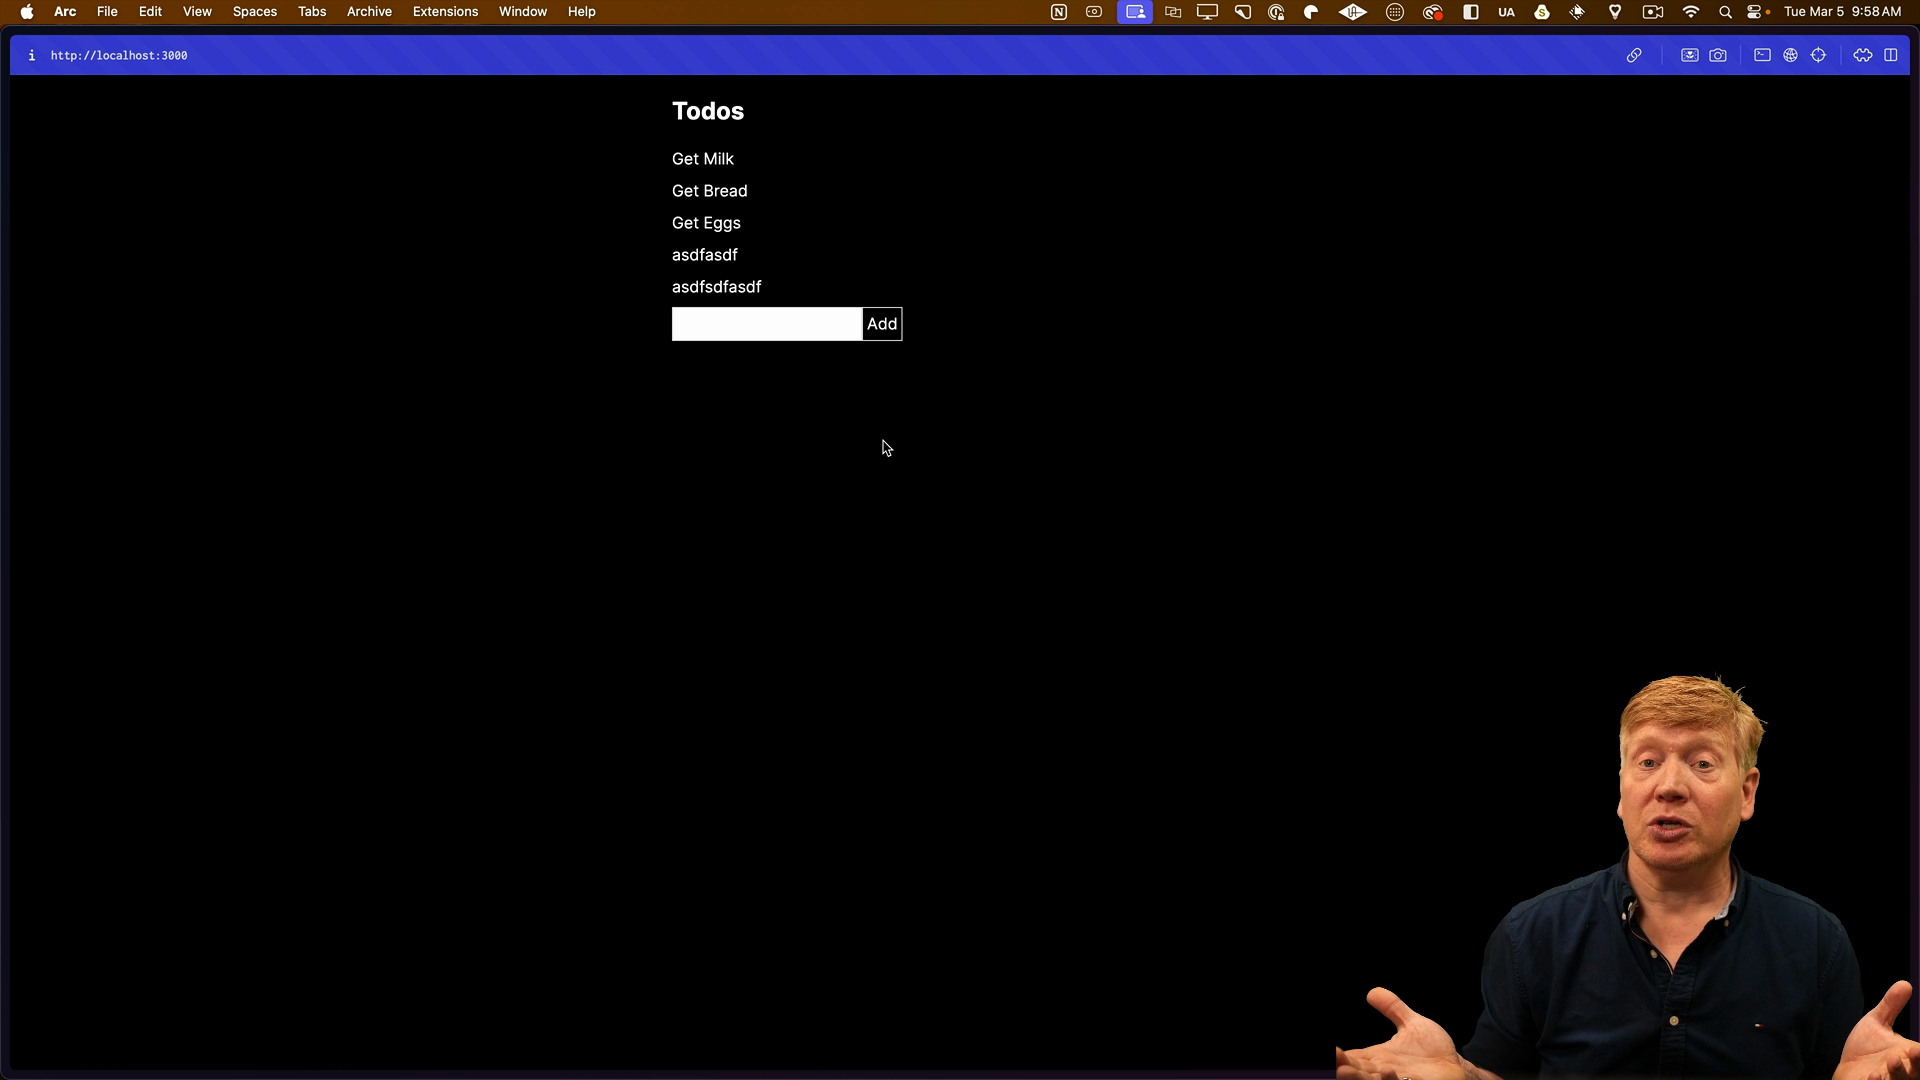
          <Todos todos={todos} />
        </main>
      );
    }
    

    Now the to-dos should now be displayed as a list in the browser:

    to-do items are displayed

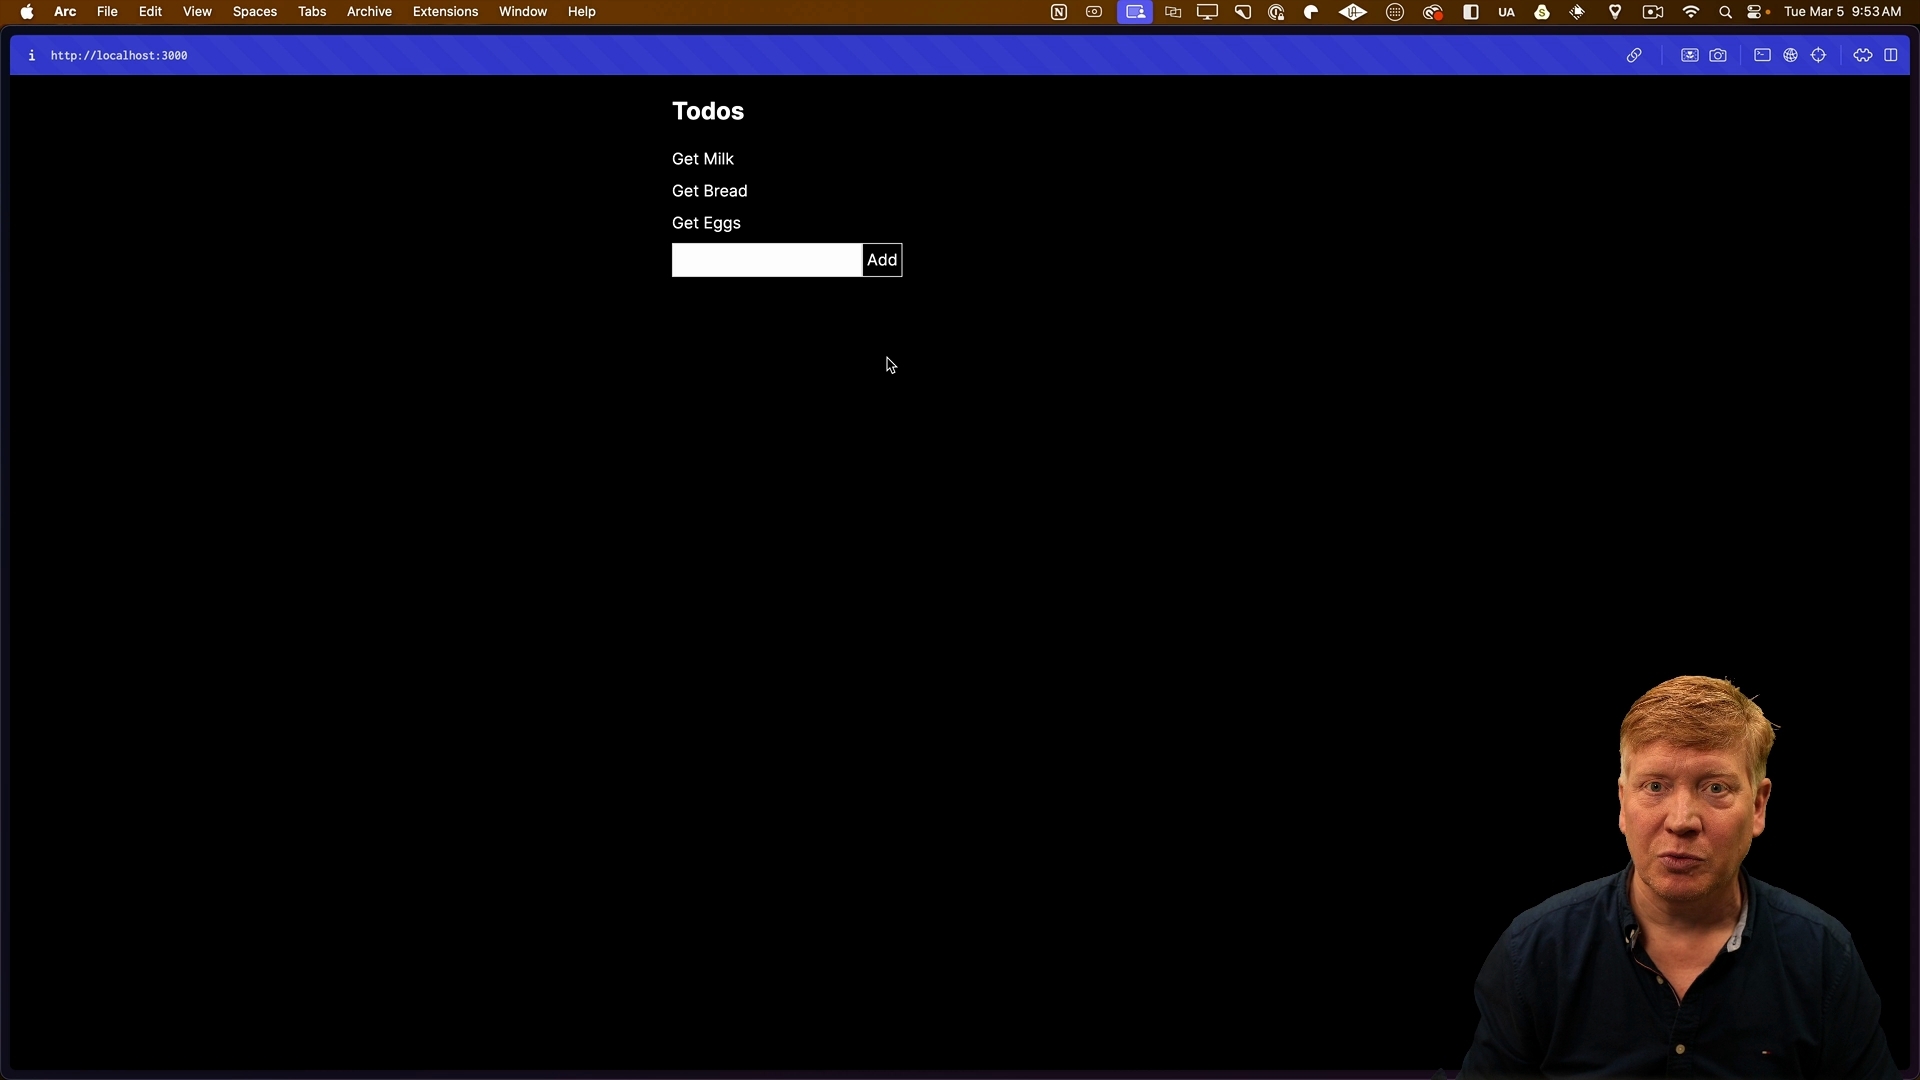
    Adding a Form to Create To-Dos

    In order to allow users to add new to-dos, we need to add a form in the Todos component. This will require the useState hook to manage the input value.

    // app/Todos.tsx
    'use client';
    
    import { useState } from 'react';
    
    // below the todo list:
    
    <form onSubmit={async (e) => {
      e.preventDefault();
      setNewTodo("");
    }}>
      <input
        type="text"
        value={newTodo}
        onChange={(e) => setNewTodo(e.target.value)}
        className="border p-1 text-black"
      />
      <button type="submit" className="border p-1">
        Add
      </button>
    </form>
    

    The form uses the newTodo state to manage the input value and calls the addTodo function on submit.

    the form is displayed

    Now that the form is in place, we need to wire it up so that to-dos can be added.

    Inside of the page.tsx file, import the addTodo function from todos an add is as a prop on the Todos component:

    // inside page.tsx
    
    import { getTodos, addTodo } from "@/todos";
    
    // inside the return
    <Todos todos={todos} addTodo={addTodo} />
    

    Now over in the Todos.tsx file, we need to add the addTodo prop to the component and wire it up to the form. It is typed as a function that takes a title and because it's async it will return a Promise to void:

    export default function Todos({
      todos,
      addTodo,
    }: {
      todos: Todo[];
      addTodo: (title: string) => Promise<void>;
    })
      ...
    

    Now when we try to submit a new to-do item, we get an error because functions cannot be passed directly to client components:

    error message

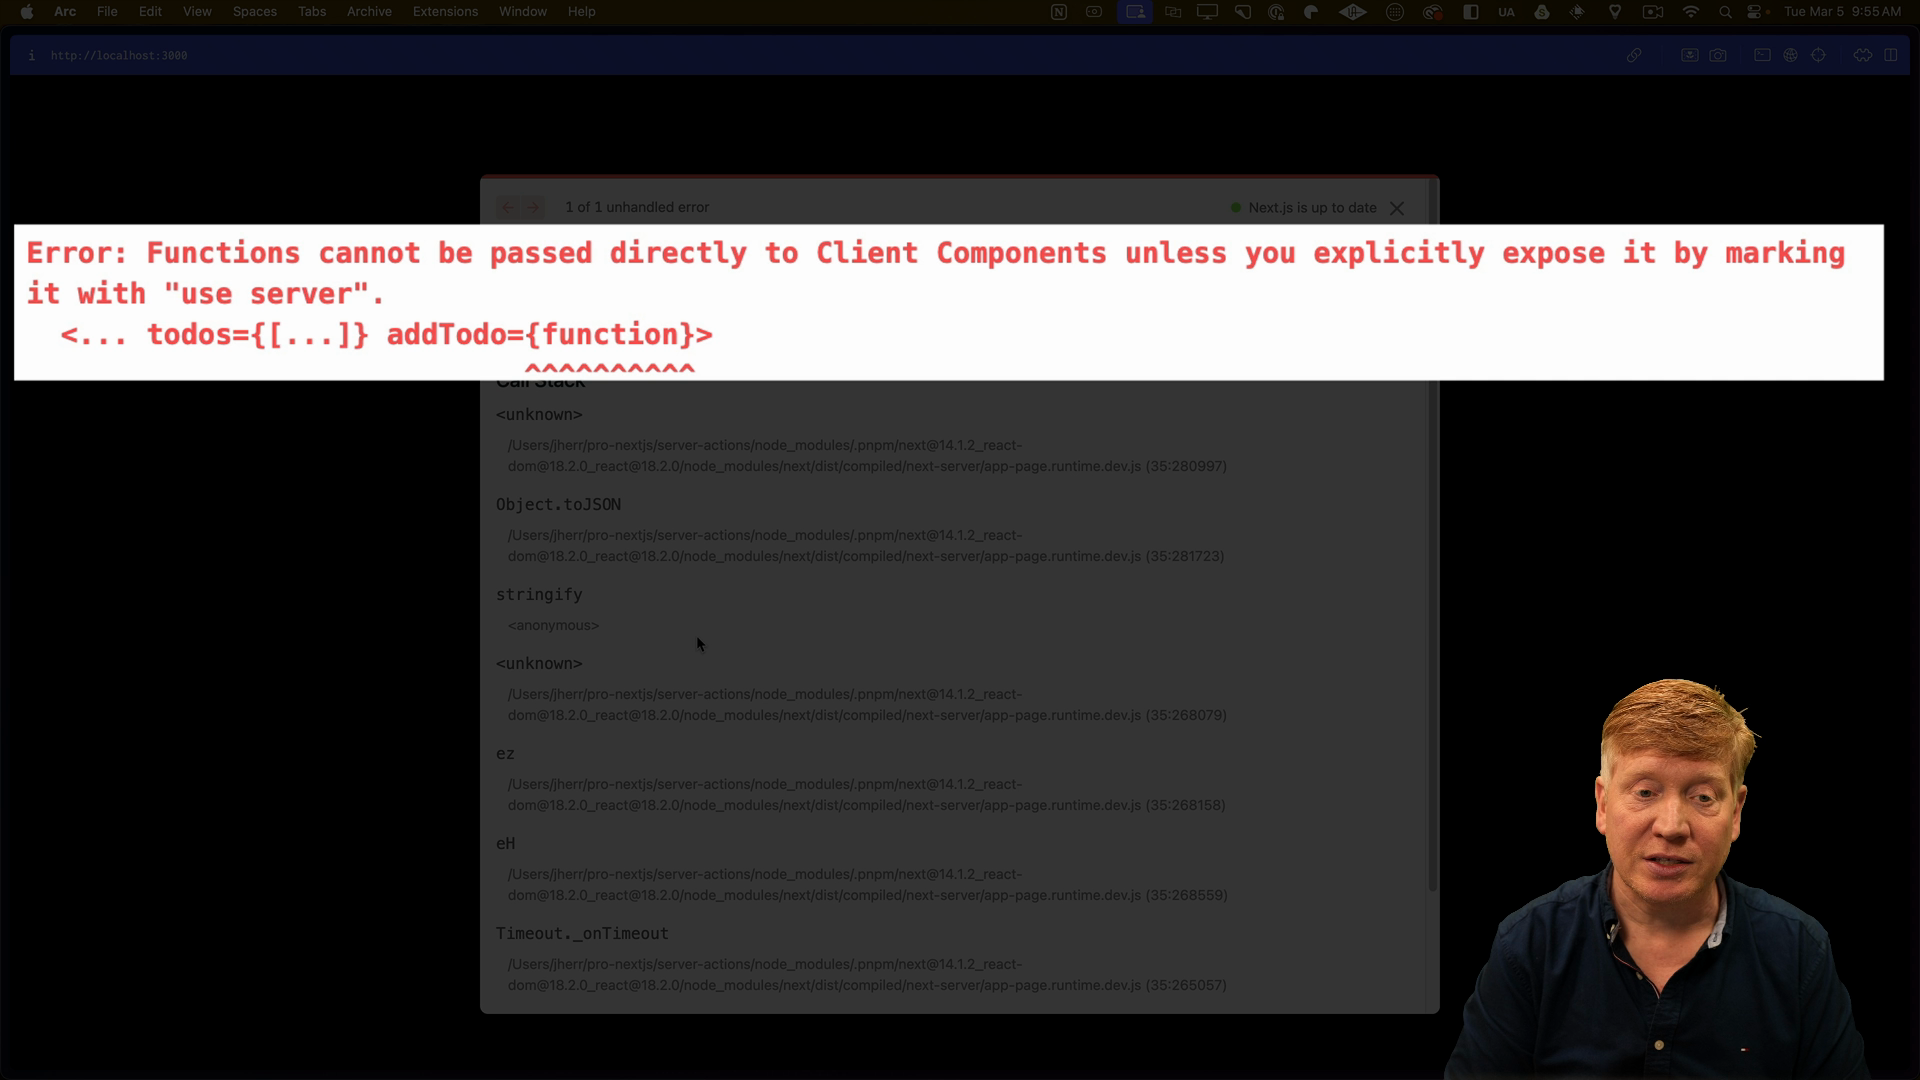
    The 'use server' directive indicates that the function should be executed on the server when called from the client. We can add it to the addTodo function directly:

    export async function addTodo(title: string) {
      "use server";
      const todos = await getTodos();
      ...
    

    Now, when you submit the form, the addTodo function will be invoked on the server without error. The submit button is hit, a POST request is made, and Next.js takes care of the rest for us.

    However, the item won't be displayed until a refresh.

    Revalidating Data

    We need to revalidate the data to fetch the updated list of to-do items. Inside of todo.ts, import revalidatePath from next/cache:

    // src/todos.ts
    import { revalidatePath } from 'next/cache';
    

    The revalidatePath function tells Next.js to invalidate the data at the specified path and refetch it on the next request. We'll call it with the root / path after adding a new to-do:

    // inside of the addTodo function
    
    ...
    await fs.writeFile("todos.json", JSON.stringify(todos, null, 2));
    revalidatePath("/");
    

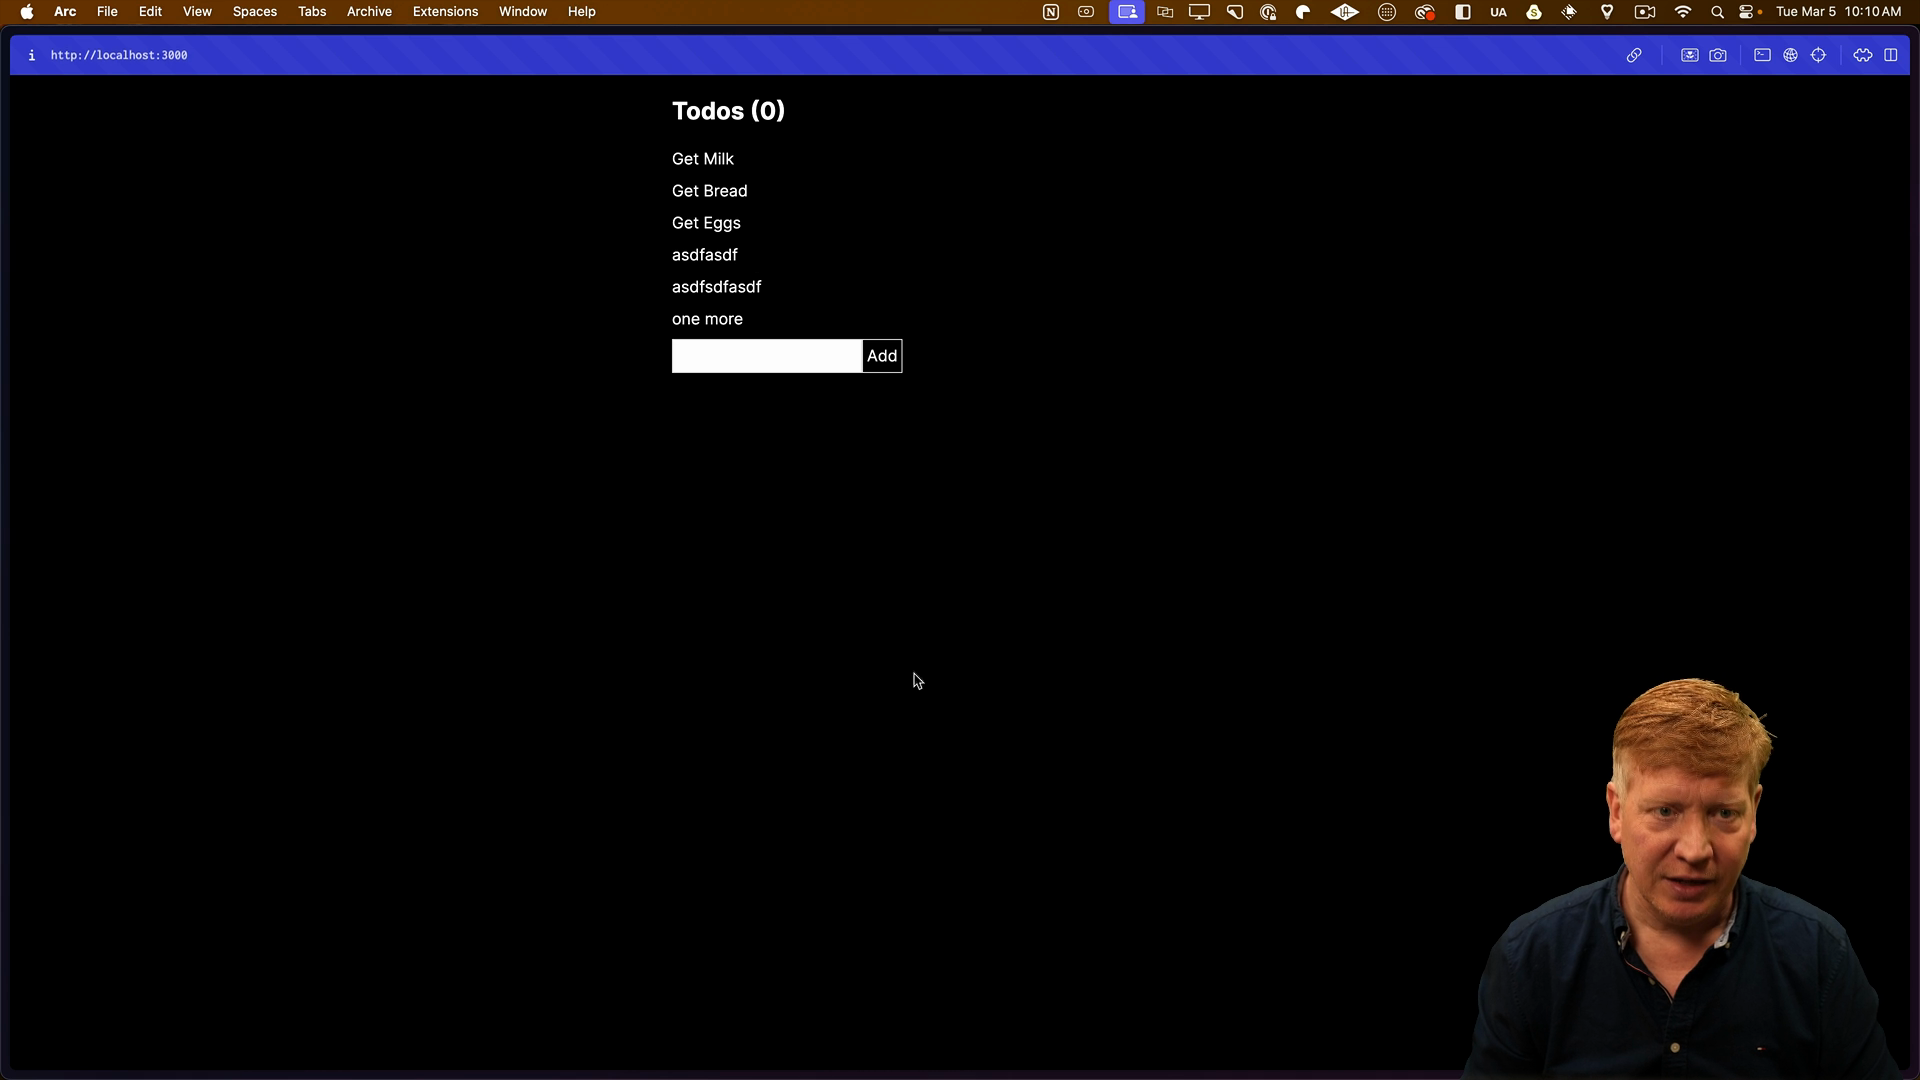
    After this change, a new to-do item will be added to the list without needing to refresh the page:

    a new todo appears

    This works, but it could be better.

    Using Unstable Cache

    Using revalidatePath means that the addTodo function needs to know what parts of the app are maintaining and showing the list of to-dos.

    To avoid tightly coupling the addTodo function with specific routes, we can use the unstable_cache function from Next.js. This function allows us to cache the result of a function and assign a tag to it. We can then invalidate the cache by calling revalidateTag with the same tag.

    Instead of using revalidatePath, we'll instead use unstable_cache and revalidateTag from next/cache:

    // src/todos.ts
    import { unstable_cache, revalidateTag } from 'next/cache';
    

    We'll then create a getTodos constant using the unstable_cache function to wrap the getTodosFromFile function and assign tags to the cache:

    export const getTodos = unstable_cache(
      getTodosFromFile,
      ["todo-list"],
      {
        tags: ["todos"]
      }
    );
    

    At this point we actually have stronger caching that we did before. The entire todo list has been cached by Next, so we need to use the revalidateTag function to invalidate the cache for the todos tag:

    // inside of the addTodo function
    await fs.writeFile("todos.json", JSON.stringify(todos, null, 2));
    revalidateTag("todos");
    

    With this change, the list will reload and the to-do system only needs to know that there is data tagged as todos instead of knowing about application routes.

    Fetching Data on the Server

    To display the total count of to-dos, we can fetch the data on the server and pass it as a prop to the client component.

    Inside of the todos.ts file, add a new function called getTodoCount that fetches the to-dos and returns the count. We'll also use the "use server" directive to specify that this function should run on the server:

    // inside todos.ts
    
    "use server";
    
    // ...rest of file as before...
    
    export async function getTodoCount() {
      const todos = await getTodos();
      return todos.length;
    }
    

    Now in the Todos.tsx component file, we'll import the getTodoCount function and use a useEffect to track the count state:

    // inside Todos.tsx
    
    const [todoCount, setTodoCount] = useState(0);
    
    useEffect(() => {
      getTodoCount().then(setTodoCount);
    }, []);
    

    Finally, we'll use the todoCount in the component to display the total number of to-dos:

    // inside the Todos component:
    
    <h2 className="text-2xl font-bold mb-5">
      Todos ({todoCount})
    </h2>
    

    Now the count will display, but it starts at 0 then flips to 6 because the Todo component is a client component:

    the count initially shows as 0

    Comparing Server Actions to API Routes

    Looking in the Network tab of DevTools, notice that the request method to fetch the data is a POST, which means we can't cache the request.

    Making GET requests to the server using server actions will always result in POST requests.

    If you were to use an API route, you get to control the verb and could use GET to fetch the data and have it stay as a GET. API routes also allow you to control the format of the request, which you can't do with server actions.

    Fetching the data on the server avoids the need for an additional request from the client.

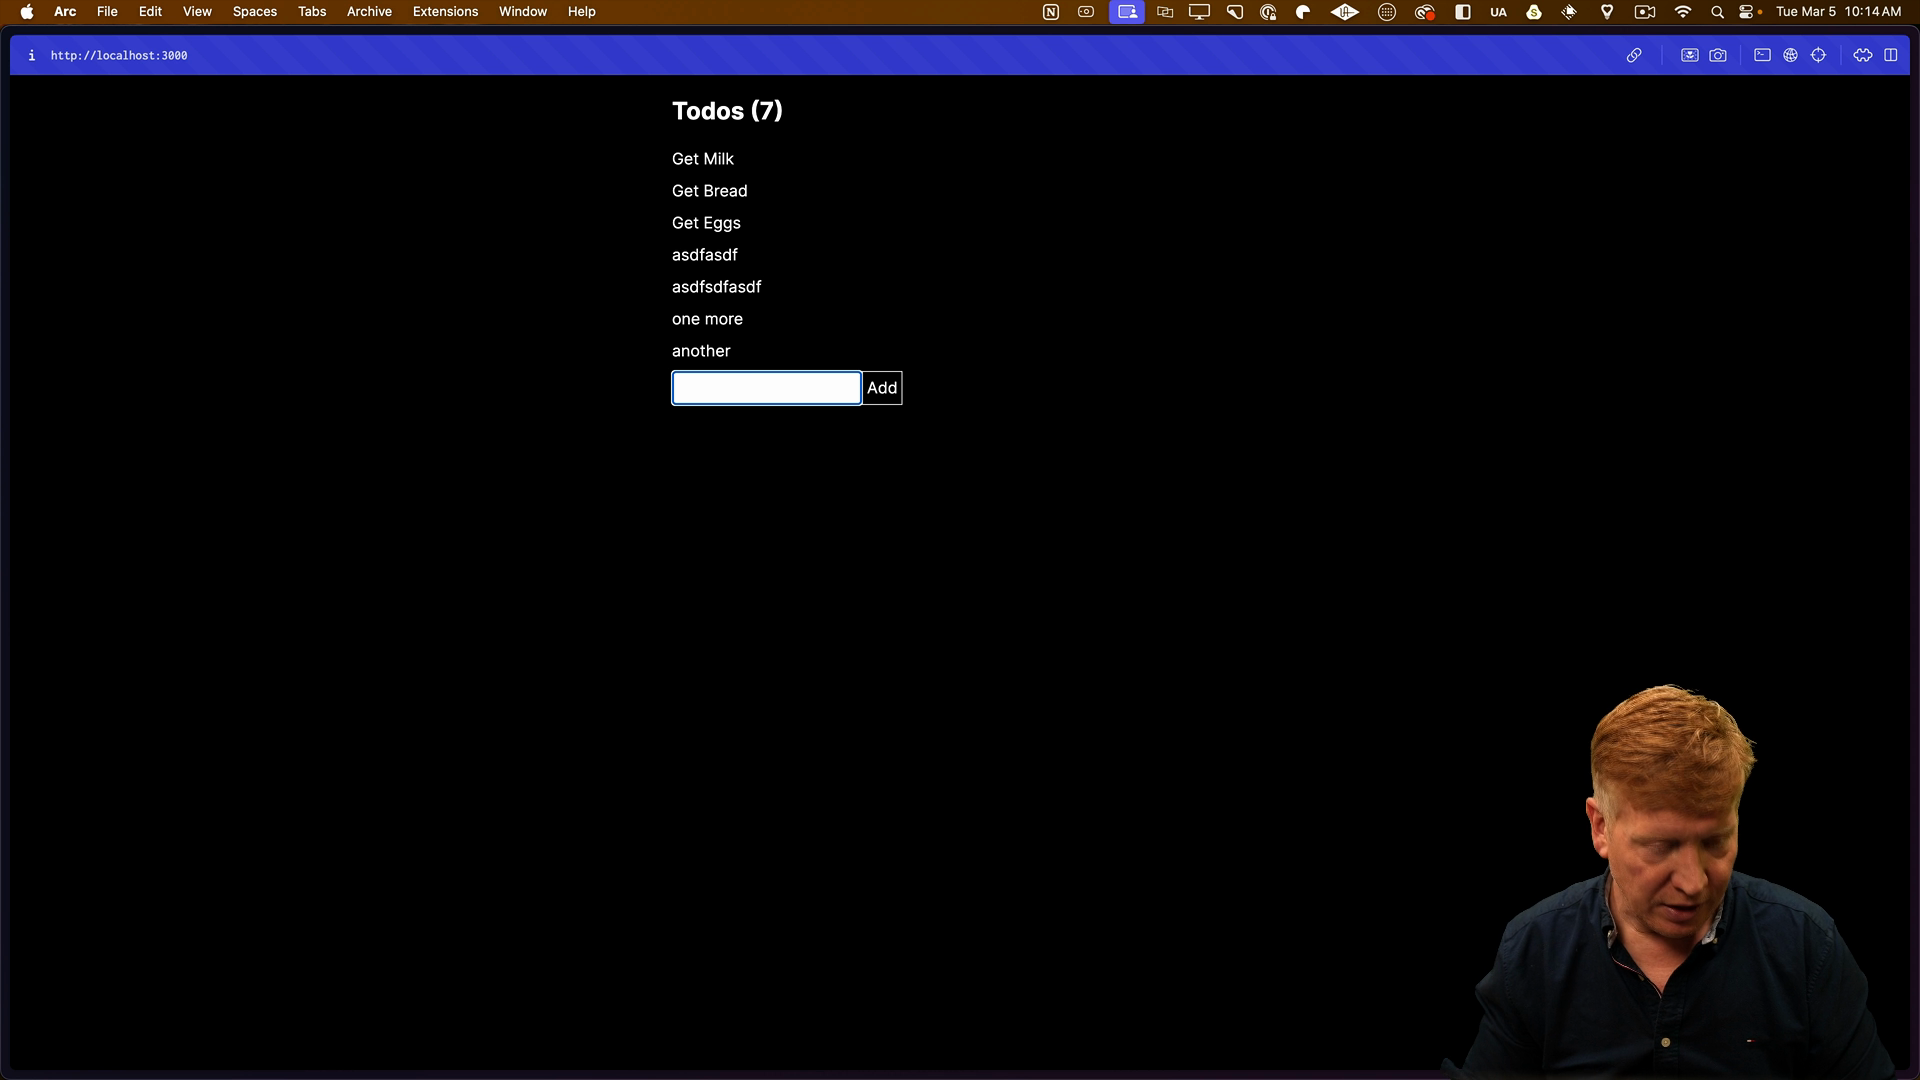
    In order to fix the extra request for the to-do count, we can get the count and pass it as a prop instead of making the call from the component.

    // inside page.tsx
    
    import { getTodos, addTodo, getTodoCount } from "@/todos";
    
    export default async function Home() {
      const todos = await getTodos();
      const todoCount = await getTodoCount();
    
      return (
        <main className="max-w-xl mx-auto mt-5">
          <Todos todos={todos} addTodo={addTodo} todoCount={todoCount} />
        </main>
      );
    }
    
    // inside Todos.tsx
    
    export default function Todos({
      todos,
      addTodo,
      todoCount
    })
    

    Now the count will display without the flip from 0 to the current count, and adding items works as expected:

    the to-do count

    Wrapping Up

    We looked at several different ways to fetch data and revalidate it in a Next.js application. Server actions are great for communicating between the client and server securely, but they do have some trade-offs.

    For fetching data, using server-side rendering and passing the data as props may often a better choice than using server actions.

    To learn more, check out the Form Management with Next.js App Router tutorial that goes deeper into some of what we covered here.

    Transcript

    In this next section, we're going to implement the ChatGBT functionality in our app. So when you hit enter on a question on a client, we're going to need to somehow get that question over to ChatGBT to get a completion from the AI. Now you could call ChatGBT directly from a client, but that would expose our OpenAI token,

    which would not be good. So we're going to have the client call back to the server, and then the server is going to actually make the request to OpenAI and then send back the results. That way, it keeps our OpenAI token secure. Now we could just use an API route for that, and the AppRouter supports that, but the AppRouter

    has also added an entirely new way for the client to talk to the server called server actions. Server actions are such a fundamental part of the AppRouter that it's definitely worth doing another experimentation session before we try it out in our app. So let's go make a new test app and try out server actions.

    And just like before, I strongly recommend that you try this out for yourself so you get comfortable with server actions because we're going to be using them a lot. All right, so I'm back in my terminal. I'm going to go create a new app called server actions.

    I'll take all the defaults, including, of course, that we want to use the AppRouter. And then I'll bring that up in VS Code. All right, so what I'm going to do is I'm going to go create a little to-do list application. You've probably seen this before, but let's go first and remove everything from our page.

    Don't need any in the boilerplate here. And I'll just use some tailwind to put the app in the middle of the screen. Now for our database, I'm just going to use a local file called to-dos.json, and we'll put in there some simple to-dos. Each one has a title completed and an ID. So now we want to create some functions that allow us to get the list of to-dos as well

    as add a to-do. So where are we going to put those? Well, I'm going to put those at the top level of source in a file called to-dos.ts. And the first thing I'm going to do is define what a to-do looks like. So it's going to have an ID, a title, and a completed, just like we saw in to-dos.json. Then because it's a file, I'm going to bring in the fs library.

    So I'm going to use the promise variant of that so we can read and write the file. So let's create our first function for getting the list of to-dos. It's called get to-dos. It's an async function, and it just simply reads that to-dos.json file and then returns the parsed output. Then to add a to-do, we'll create an add to-do function that takes a title, which is a string,

    gets the original list of to-dos, creates a new to-do with a new random ID in that, and then pushes that onto the list of to-dos and then writes that file. So let's go see if this actually worked. We'll go over to page. We'll bring in get to-dos from to-dos. Notice I'm using @to-dos there.

    @ in this case maps to /source. So that's /source/to-dos. I could also do ./to-dos if I wanted, but I prefer @to-dos, honestly. I'm going to call get to-dos, but it returns a promise. So I want to await that, but I'm not in an async function, so let's make that an async function.

    And then for the moment, let's just output what we get. All right, now we'll go run the server, then we'll go check it out in the browser. All right, cool. Looks good. We've got our to-dos coming back. Great format. So, awesome. Let's go create a client component so that we can actually interact with this.

    So I'm going to create a new file in the app directory called to-dos.tsx. And into that, I'll bring a simple client component called to-dos. It takes a list of to-dos defined by the type from the to-dos at this top level. And then it goes through those to-dos and puts out an LI for each one in a map.

    All right, let's try it out. Go back to our page, import that to-dos, and then we'll invoke that, and I'll get rid of my pre. Let's see. All right, looks pretty good. But of course, we want to be able to add a to-do, so we need a text box that we can type

    a to-do into and then hit submit, and then it'll go back to the server and add a to-do. So to do that, we're going to need some state, and we'll create some state called new to-do that's going to have our new to-do text in it. And then down below this UL, we'll create a new form that has our input in it. That input's going to be managed by that new to-do and set new to-do.

    There's going to be an add button that is a type of submit, and then the form is going to have an on-submit that basically just prevents the default behavior because we don't want to resubmit the page. And then currently just sets the new to-do to a blank string because you just want to reset it. So let's go and make sure that this works. All right.

    Yeah, okay. That seems to work okay. So let's go back into our app. So now what we want to do is invoke add to-do somewhere. Now what we can do is we can send add to-do to that client component as a property. Okay.

    So we'll go over here to to-dos, we'll say we're going to get add to-do, and add to-do is a function that takes a title, and because it's an async function, it returns a promise to avoid, which means that it doesn't return anything. All right. Let's give it a go. Now we're getting an error from Next.js.

    It's telling us that we can't send a function to a client component unless it's defined using use server. So let's actually just go grab that and go back here into our to-dos.ts. And well, what can we do?

    We can go and add that to this function directly by just adding use server. Now it seems to be okay. Awesome. So let's give it a try. So let's go down here and do add to-do, we'll wait it, and we'll give it our new to-do, and we'll see. All right.

    Let's give it a try, hit add, and now it didn't work, but if I hit refresh, it does work. So sort of cool, I mean, honestly, really cool, because what's happening is we are just invoking this function, add to-do, and what's actually happening is that we are making a

    POST request to the server, which is then getting sent to that add to-do function, and Next.js is handling packaging up the arguments, in this case, title, and returning the results, which in this case is a void, but it is managing all of that for us for free.

    In the Pages Writer, we would have had to expose an API endpoint for that, which has its advantages in some cases for sure, but for simplicity's sake, this is just a super easy way to connect the client to the server. But of course, we have this issue of not getting the update, so what are some options to go and fix that?

    Well, if I go back here to our to-dos.ts, one thing I know I can do is revalidate that /path, and that's going to tell Next.js that that has changed, and it will actually force an update on the client to go and get the new data.

    So I'll bring in revalidate path from Next Cache, and then down here, I'll revalidate the /path because I know / is where I actually show those to-dos. So let's give it a try, and let's add another to-do, and that works right away.

    How cool is that? Though I gotta say, I'm not super happy with that. So revalidate path, that means that this add to-do function actually has to know what parts of the app are actually maintaining and showing the list of to-dos, which I think is a little

    bit wonky, but I'd rather have a looser coupling. So I'd rather be able to say that there's a to-do list out there, and then when it changes, anything that depends on to-do list should go and get revalidated. I don't care whether it's / or /to-dos or whatever route you're on, just invalidate yourself. Okay, so there's another choice to make that happen.

    There's a Next.js function called unstable cache, and what unstable cache allows us to do is wrap any function, whether it's a database function, or in this case, a file-based function that goes up and gets some files, and say that we want to cache the output of that,

    and then we can assign some tags to it and say that we want to invalidate those tags. So that's actually really cool. Let's go try it out. So instead of revalidate path, I'm going to bring in revalidate tag and unstable cache

    from next cache, then I'm going to rename get-to-dos to get-to-dos from file, because get-to-dos from file is the thing that actually does the work, but we want to wrap it in a cache and we want to send that back as get-to-dos. To do that, we're going to export a new constant called get-to-dos, and then call unstable cache.

    Now, unstable cache, the first thing you give it is the function that's actually going to get whatever is going to go into the cache. In this case, that's get-to-dos from file. You also give it a name and an array, we'll call it to-do list. And then optionally, you can give it some tags.

    So I'll give it some tags, and I'll say that this is the list of to-dos. Okay, let's add another one, click add, and refresh. This is actually more cached than we had originally, because we're not going out to the file on every request.

    Now we actually have this cache built into Next.js when we're saying that to-do list is completely cached. So we actually need to revalidate tags to bust that cache. To do that, we'll go to the end of our add-to-do and revalidate the tag of to-dos.

    And that to-dos has to match the tags in this unstable cache. All right, now let's give that a try. So I add one more, and there we go, looking good. And look at how much more loose the coupling is.

    The to-do system only needs to know about the fact that it's created this data tagged as to-dos, and we can revalidate that tag from anywhere. It doesn't need to know anything about the routing setup of the application. So now you can see how easy it is to do something like add-to-do and make a mutation on the server given a server action.

    Should we replace all of our API routes with this? What about requesting data from the server in just a get? What if we want to get data from the server? Should we use server actions for that? Well, okay, let's give it a try. Let's add a new get on here.

    We'll get get to-do count, and it'll just return the count of all the to-dos. And we'll make it a server action by putting on use server on there. All right, now let's go over to the client, and we'll use that get to-do count on the client to get the count of to-dos. And let's be clever.

    Let's go and say that we want to initialize the to-do count from the get to-do count function that we just created. All right, well, first off, we get this interesting issue where we can't bring in from a client component a server action that's just defined as a server action inside of the function.

    So we have to use the alternative method of defining the entire module as use server. So to do that, we go back over to to-dos.ts, and we get rid of these, but we put it right at the top of the file like we would with use client, and that means that everything in this module is meant to be only running on the server.

    So if there's an async function that's exported from here, that means that that will now be a server action. Okay, now that actually maybe worked. So let's go and take that to-do count, and we'll put it at the end of to-dos. See what happens.

    And, ooh, okay, well, that blows up, and I'm guessing that's not really good over here in the network. Oh, yeah, we're seeing like, oh, wow, yeah, okay. So we're getting this waterfall of requests, and that's because of our initialization of this use state.

    This is a pretty risky proposition here to try and use an async function to initialize a piece of state. So let's do the conventional approach of using a use effect. So we'll start out with zero, and then we'll get the to-do count, and then we'll set the to-do count with that value.

    All right, let's give it a go. Yeah, nice, that works, although you can see that flip from zero to six right there, and that's because it's going and requesting it on the client. And that's actually what I wanted to show you. So let's go over here to our network panel. All right, so at the end of our request here, we got a request to local host.

    This is our server action to go and get the to-do count. As you can see, the request method is a POST, and that means that you're not going to be able to cache this request. So if you're making GET requests to the server using server actions, those are always going

    to be these POSTS, and there's two big things there. So first, with an API route, you get to control that verb, and so you get to actually use a GET against an API route, which you don't get to use against a server action. So that's a big deal there, especially when it comes to performance and caching.

    The second thing is, with an API route, you actually get to control the whole format of the request. You don't get to do that with a server action. So if you're expecting something else like, for example, a React Native or a mobile app to use those server actions, they're going to have to try and somehow figure out what

    that request format is, and they could get that wrong. There's all kinds of issues with that. So the best thing to do in this case would be to go back over into our page, get that

    to-do count, and then send that to our to-dos directly, and then we can add it as a prop, and then get rid of calling it in our component.

    All right, that works really well, and as you can see, there's no jump between zero and six. So everything is coming off the server. We can go and add another, and there we go, to-do count is automatically updated. So really clean. Now one last thing I got to say. So we're bringing in add to-do as a prop here.

    We don't really need to do that because the entire module is set to being a user, as we saw before. We can actually just go and bring in add to-do here, and then we don't actually have to bring it in as a prop. And then over in the page, we can remove that as a prop from our invocation. Nice.

    And I think in that case, this is actually the best thing to do. The nice thing is you actually get the option, right, and you can either use this import mechanism where you can just import directly into the client component if it's only ever going to use that one server action, or you can give it a prop, and then you can potentially

    give it different server actions if you wanted to do different things based on the property that you give it. Now what I've shown you here is just one way to use server actions. There's actually another whole form action flow that also uses server actions. There's an entire tutorial series associated with this course on how to do forms in Next.js. You should check that out as well.

    But we will be covering server actions extensively through this course because they are just an incredibly powerful feature of the Next.js app writer, and they make writing applications super easy.