ProNextJS
    Loading
    lesson

    Understanding the Example Monorepo Structure

    Jack HerringtonJack Herrington

    Before we get started, we'll break down the structure of the example repo. Keep in mind that the Next.js ecosystem is constantly evolving, so while the core concepts will remain, you might see some differences between this video and your own projects.

    Navigating the README and Application Examples

    Let's start with the README. You'll find an introduction to the repository and the different system architecture groups we'll be working with: local, **back-end for front-end (BFF) **, and external.

    You'll also see:

    • Credentials for the to-do list app (Just use "test1" for both username and password).
    • Installation instructions (it's a Turborepo monorepo).
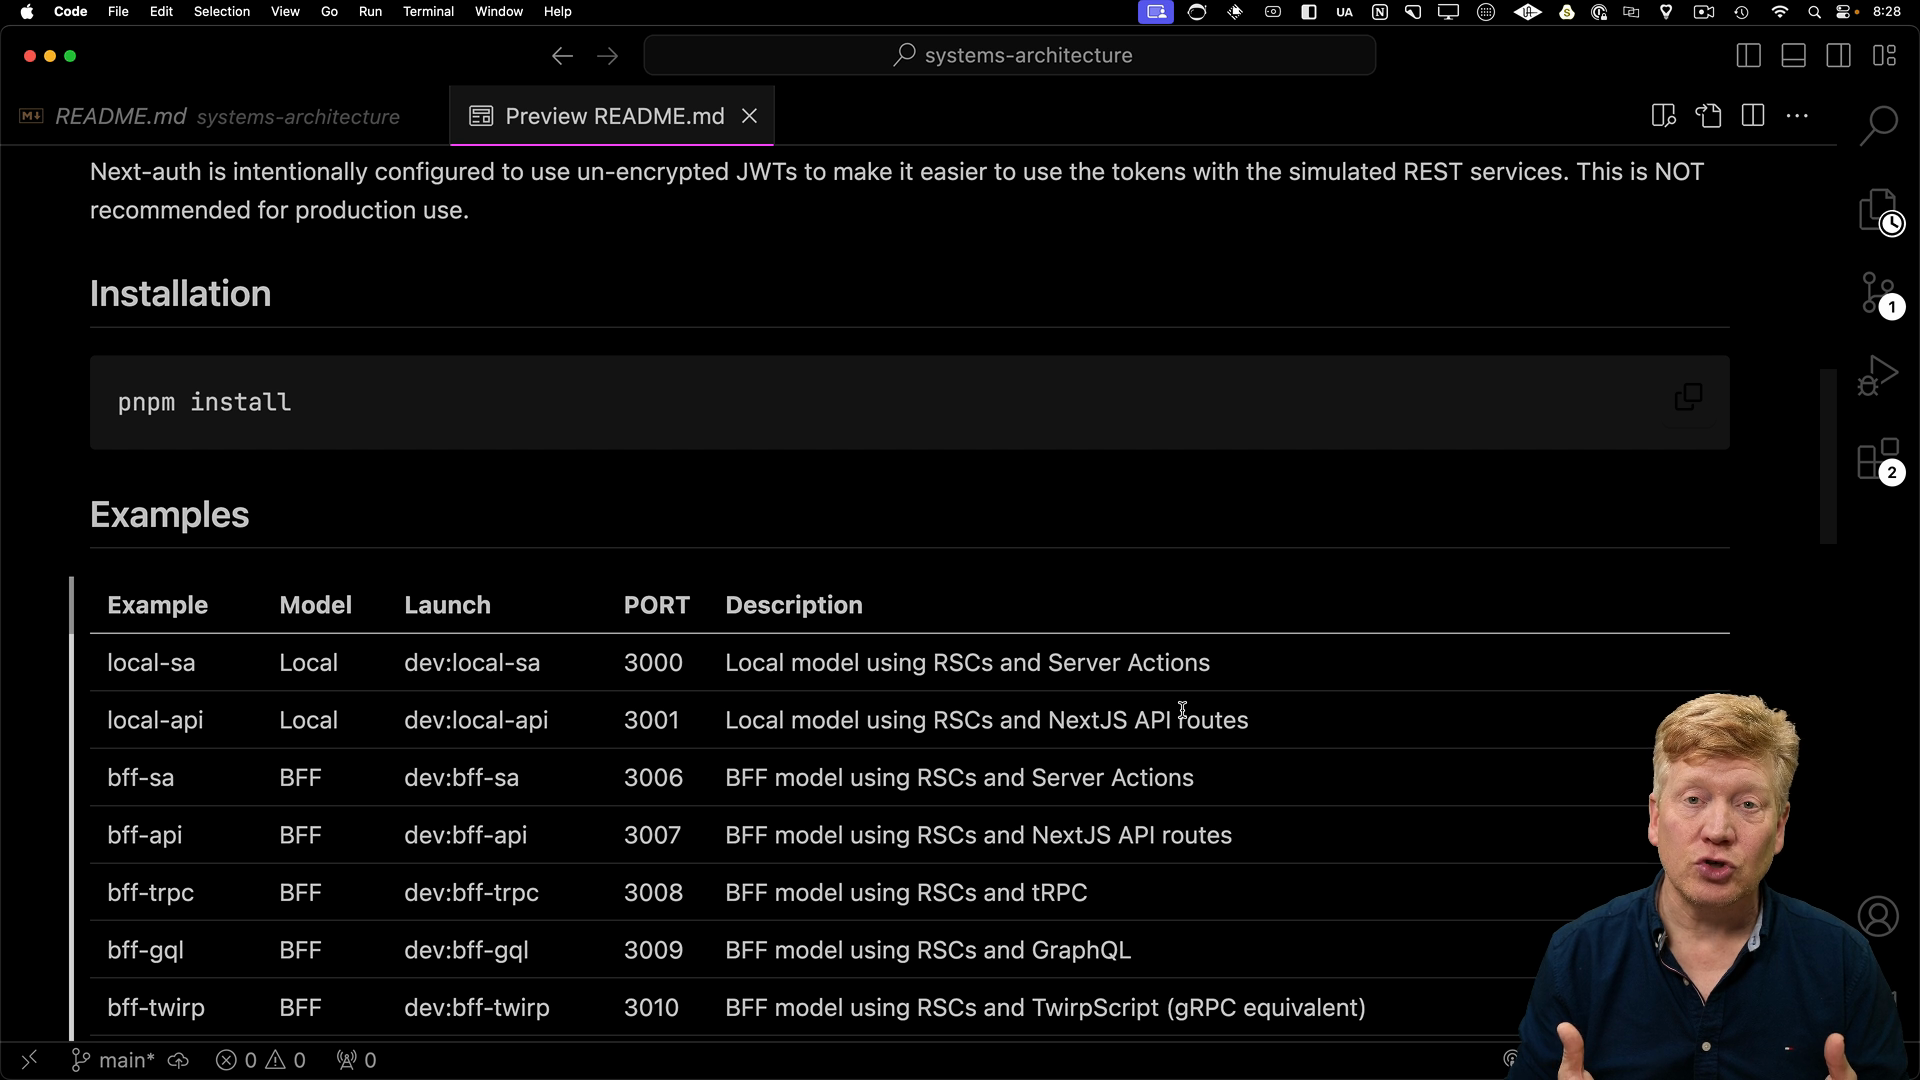
    • A handy table summarizing all the example applications:
      • Prefixes: local, bff, and external indicate the architecture type.
      • Launch Commands: Use these to start each example (e.g., pnpm run dev:localSA).
      • Port Numbers: Tell you where to find the app in your browser (e.g., localhost:3000).
      • Descriptions: Give you a quick idea of what each example demonstrates.
    the table of examples

    Important: There's no global run dev command for this repo. Running all the examples at once would be too resource-intensive. It's best to launch them one at a time.

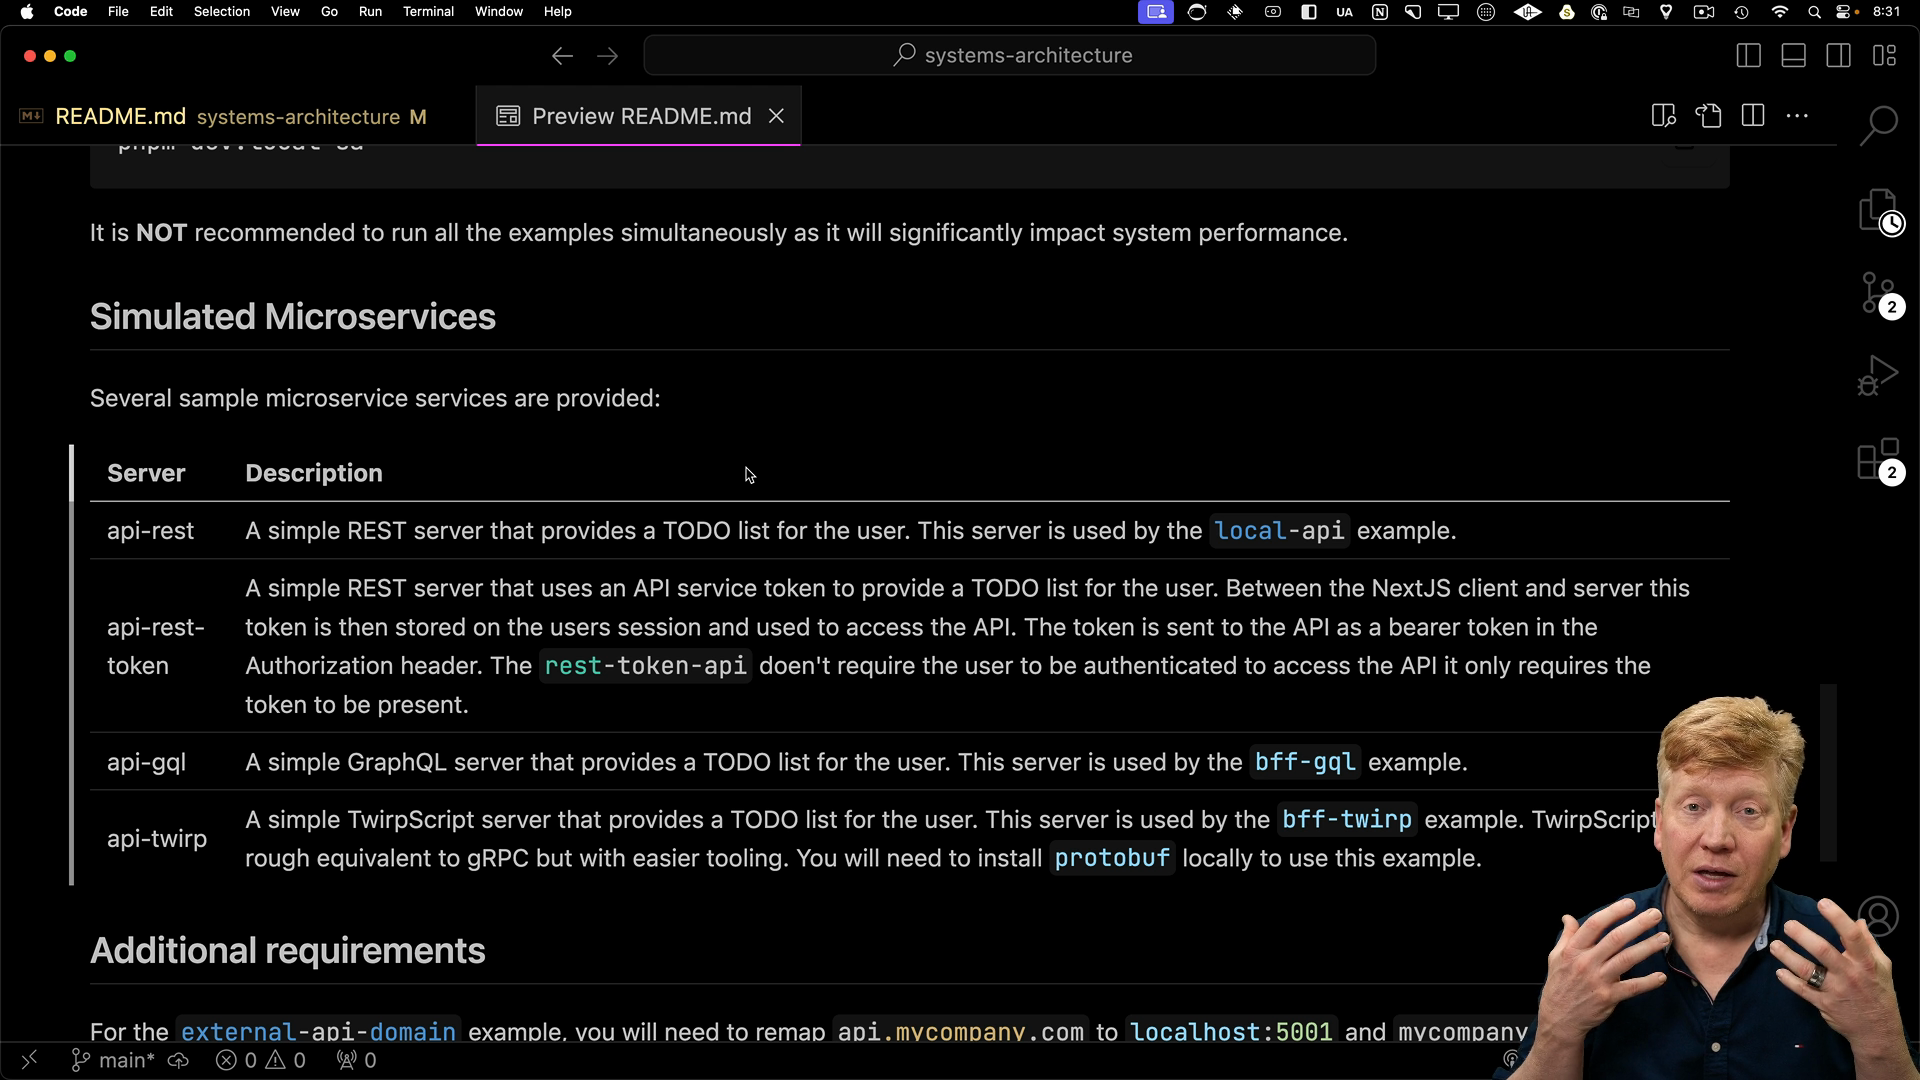
    Simulated Microservices for Realistic Scenarios

    To make these examples as practical as possible, we're using simulated microservices:

    • API REST: A straightforward REST API endpoint built with Express.
    • API REST Token: The same REST API, but it requires an access token for authentication.
    • GraphQL API: An API endpoint using GraphQL.
    • Twirp API: A gRPC-style API using the Twirp script. Note: You'll need protobuf installed for the Twirp examples.
    simulated microservices table

    For the external API domain example, you might need tools like ProxyMan or Charles Proxy to map domain names locally. Don't worry if you're not using those; you can skip that part.

    Exploring the Monorepo Structure

    Here's a quick tour of the monorepo's structure:

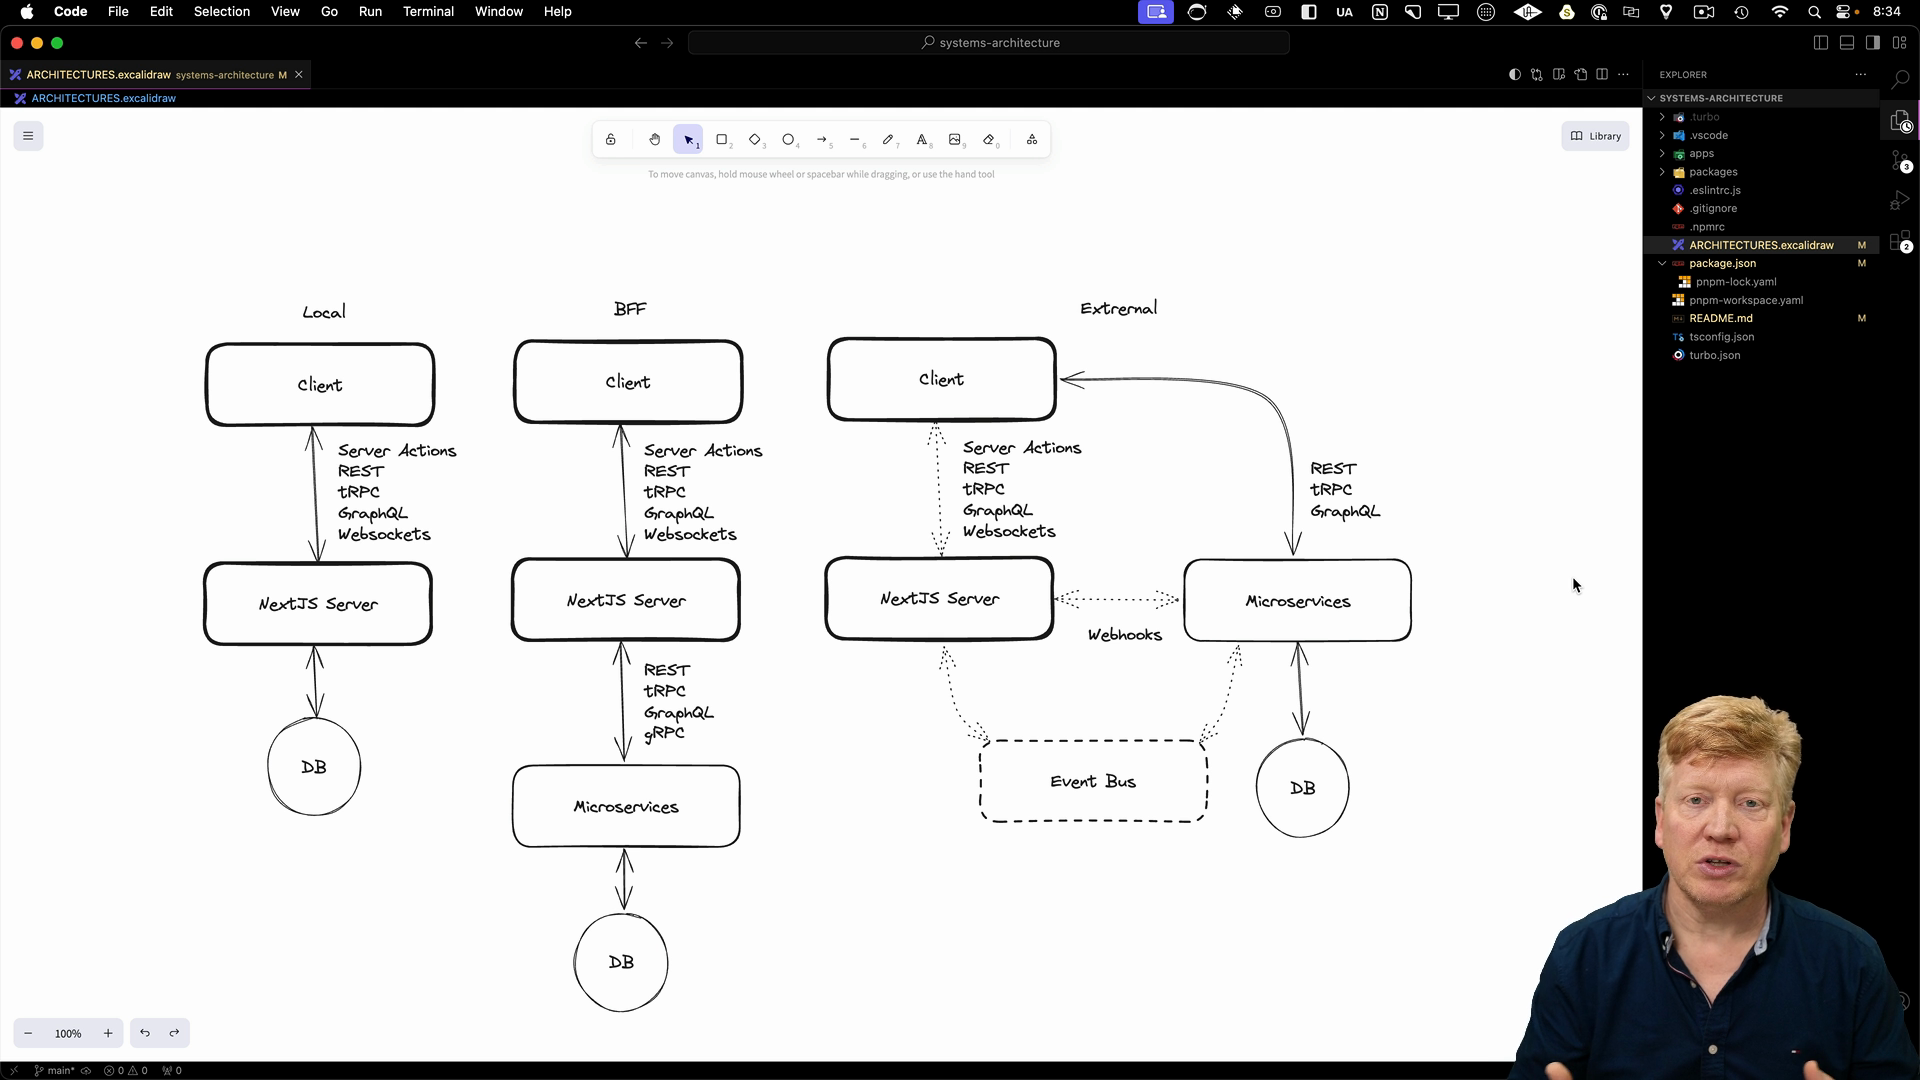
    • architectures.xcalidraw: This file provides a visual overview of the different architectures (local, BFF, external). Install the free Xcalidraw VS Code plugin to view it directly in your editor.
    • packages: This folder houses shared libraries used across our applications and microservices. Some key ones are:
      • Auth: Provides helper utilities for NextAuth, managing things like JWTs and access tokens.
      • To-dos: This is where the simulated in-memory to-do list data is managed.
      • Twirp Protos: Contains protocol buffer definitions and generated TypeScript files for the gRPC examples.
    • apps: You'll find all our Next.js applications and API endpoints here.
    monorepo structure

    Now that we have a good grasp of the repo's layout, let's start with the first architectural group – Local!

    Transcript

    Before we get into taking a look at the systems architecture groups and their examples, let's take a look at the repo itself. Now what you're seeing in this video will be changing over time. Next.js is changing. We're going to be adding more examples as we go, so expect that it'll be a repo that is structured like this but not exactly identical to what you're going to see in the video. At the top, we have the introduction to the repo and the various systems architecture groups that we're going to be working with.

    In this case, of course, local backend for frontend and external. Then we cover the overall architecture of our to-do list application, including the credentials that you need to log in. I just use test one and pass. We talk about how to install this Turbo Repo Mono Repo. Then there is a table that shows all the different systems architecture examples.

    Local systems architecture examples are prefix with local, BFF with BFF, and finally external with external. You get the model, you get the launch command, so you'd use pmpm or npm run or yarn and then let's say in the case of local SA, dev colon local SA, Then you look at the port number to see where you go on localhost to access the Next.js web server. In that case it's 3000. And then you get a high level description of what that example shows. Now there is no overall run dev for this turbo repo.

    And the reason for that is that if you were to run dev you would be running many different Next.js AppWriter applications and that would bring even the best machine to its knees. So ideally you're only going to want to run one of these at a time. The next section in the README shows the simulated microservices. In this case we've got four. The API REST, that's just a basic REST endpoint service using Express.

    The API REST token variant is one where you send an access token to it and has exactly the same API, but you use an API token for authorization. Then there's a GraphQL or GQL API, as well as a Twerp API. Twerp Script is a GRPC style API, So that's good if you are interested in how to do a GRPC. The Torbscript example requires that Protobuf be installed on your machine. The only other example that has any additional requirements is the external API domain example.

    The reason is that we're using something like ProxyMan or Charles Proxy to map mycompany.com to localhost 3005 and api.mycompany.com to localhost 5001. If that's not interesting to you, then you don't need to install any of that software. Now let's take a look at the structure of the Monorepo. At the top level there's an architectures.xcalidraw document that shows the different high-level architecture groupings that we're talking about, local, BFF, and external. To view this in place you'll need to install the free Excalidraw VS Code plugin.

    Then we got the README that I just showed you and that will keep you up to date with any changes to this repo. Next up there is packages. These are shared libraries between all of the apps and the microservices. The important ones being Auth, that's what's going to give us some helper utilities that we're going to use in conjunction with NextAuth to manage the JOTS as well as the access tokens. To-dos, which is the library that maintains the simulated in-memory to-do list, and then Torp protos which holds the proto files and the generated TypeScript files for the Torp examples.

    Next up in apps, we have the different apps as well as the different API endpoints. That's it. Let's start digging into our examples of our first architectural grouping, the local grouping.