ProNextJS
    Loading
    lesson

    Token Variation of the External Systems Architecture

    Jack HerringtonJack Herrington

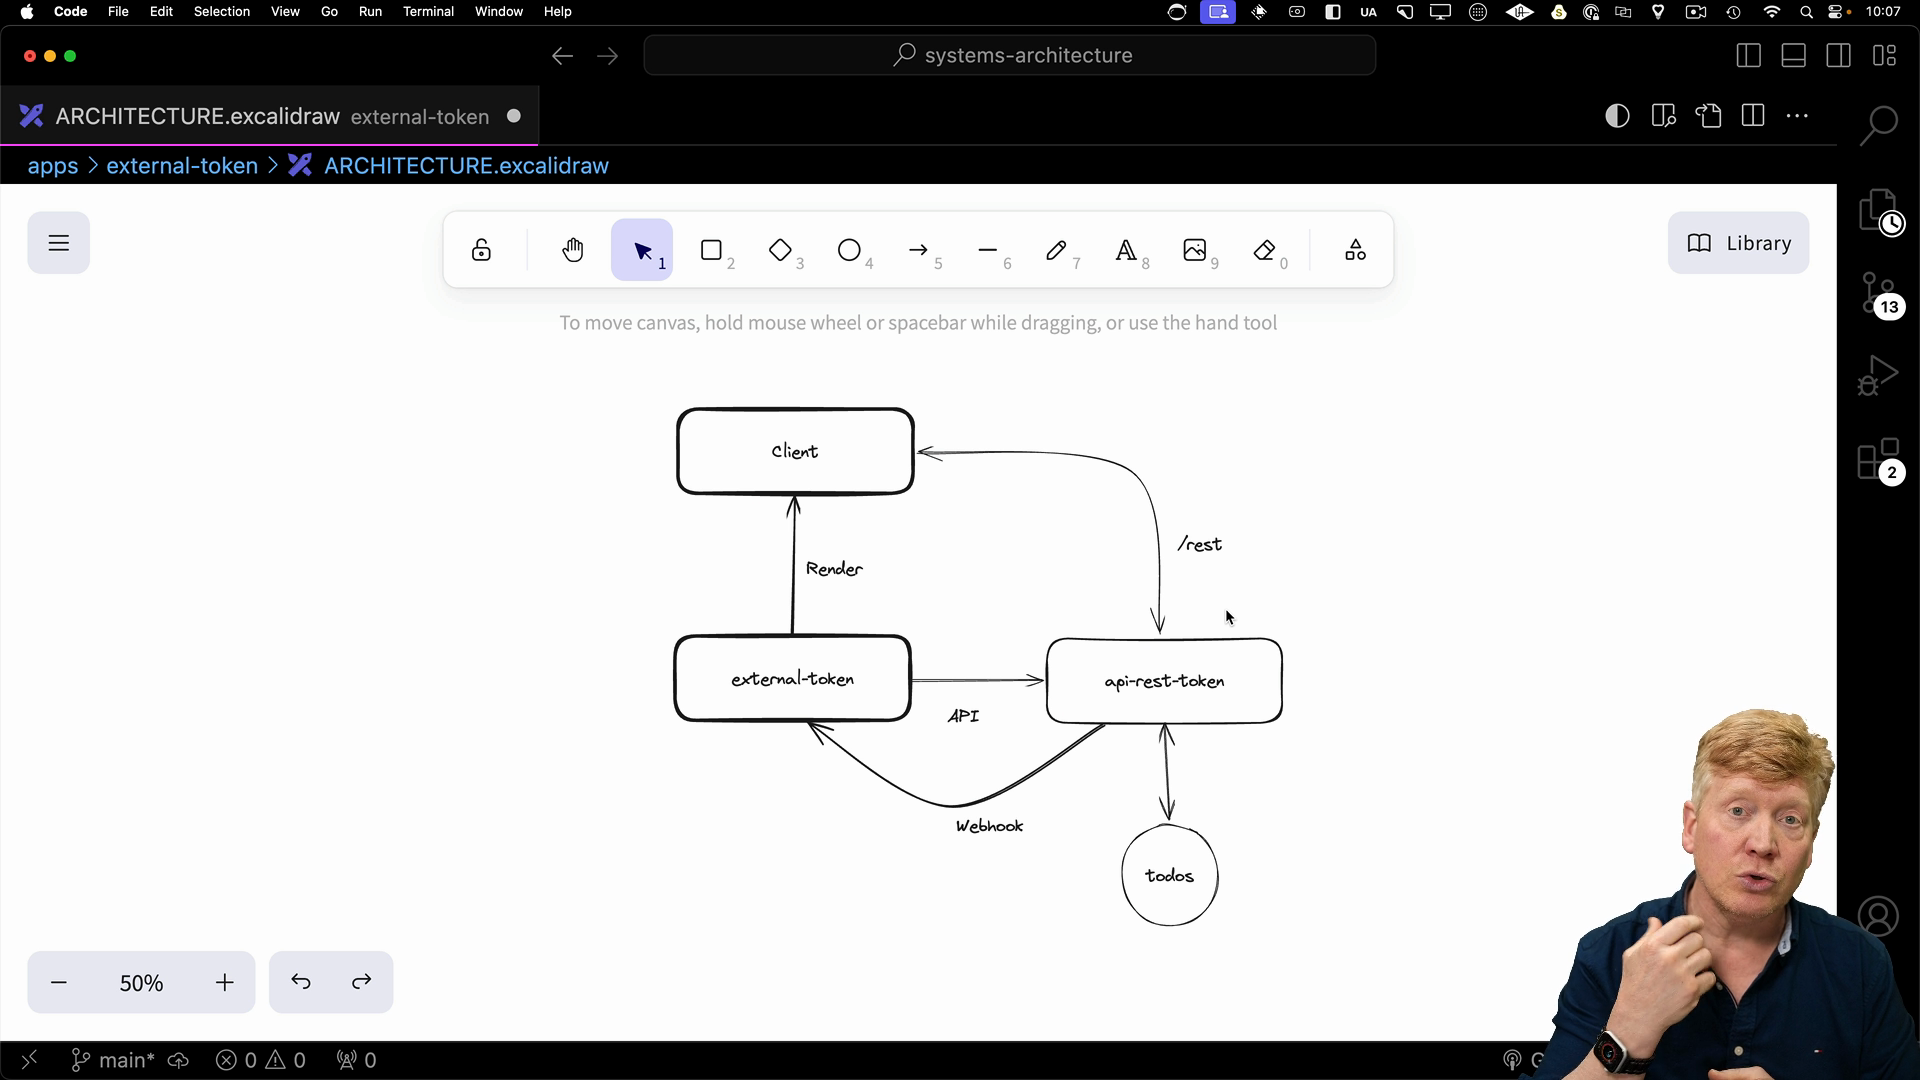
    This approach uses a service token to handle authentication between a Next.js client and an external API. We'll set up a proxy in Next.js and use a bearer token strategy to make authenticated requests.

    the token architecture

    Setting up the Next.js Proxy

    First, we'll look at the apps/external-token/next.config.mjs file:

    /** @type {import('next').NextConfig} */
    const nextConfig = {
      transpilePackages: ["@repo/ui"],
      rewrites: async () => {
        return [
          {
            source: "/rest/:path*",
            destination: "http://localhost:5002/:path*",
          },
        ];
      },
    };
    
    export default nextConfig;
    

    This configures a rewrite rule in the Next.js server to proxy requests made to /rest to the external API.

    In this setup, any request hitting /rest on the Next.js server will be forwarded to http://localhost:5002, effectively acting as a proxy to our external API.

    Homepage

    The homepage uses next-auth to manage user sessions and store the service token. Upon successful authentication, we'll fetch a token from our authentication logic.

    // inside page.tsx
    
    import { auth } from "@/auth";
    import { Todo } from "@repo/todos";
    
    import AuthButton from "@/components/AuthButton.server";
    
    import TodoList from "./TodoList";
    import { SessionProvider } from "next-auth/react";
    
    const REST_API = process.env.REST_API;
    
    export default async function Home() {
      const session = await auth();
    
      const priorities: string[] = await fetch(`${REST_API}/priorities`).then(
        (resp) => resp.json()
      );
    
      const todos: Todo[] = session?.user
        ? await fetch(`${REST_API}/todos`, {
            cache: "no-cache",
            headers: {
              Authorization: `Bearer ${session.user.token}`,
            },
          }).then((resp) => resp.json())
        : [];
    
      return (
        <main>
          <AuthButton />
          {session?.user && (
            <SessionProvider session={session}>
              <TodoList todos={todos} priorities={priorities} />
            </SessionProvider>
          )}
        </main>
      );
    }
    

    The auth Package

    Here's what the auth package looks like:

    // inside packages/auth/index.ts
    
    import { decodeJwt, SignJWT } from "jose";
    
    export const SECRET = "simple-secret";
    
    export function getUserToken(user: string) {
      return `token:${user}`;
    }
    
    export function getUserFromUserToken(token: string) {
      return token.replace("token:", "");
    }
    
    export async function encodeJWT(token: Record<string, any>) {
      return await new SignJWT(token)
        .setProtectedHeader({ alg: "HS256" })
        .sign(new TextEncoder().encode(SECRET.toString()));
    }
    
    export async function decodeJWT<Payload>(
      token?: string
    ): Promise<Payload | null> {
      return token ? decodeJwt(token?.toString()) : null;
    }
    
    export function validateUser(credentials: {
      username: string;
      password: string;
    }) {
      const users = [
        {
          id: "test-user-1",
          userName: "test1",
          name: "Test 1",
          password: "pass",
          email: "test1@donotreply.com",
        },
        {
          id: "test-user-2",
          userName: "test2",
          name: "Test 2",
          password: "pass",
          email: "test2@donotreply.com",
        },
      ];
      const user = users.find(
        (user) =>
          user.userName === credentials.username &&
          user.password === credentials.password
      );
      return user ? { id: user.id, name: user.name, email: user.email } : null;
    }
    

    In addition to setting the user id on the session, we also set a token that is given to us from getUserToken. This token is used to authenticate requests to the external API.

    Again, note that the token is not secure and is only used for demonstration purposes!

    The TodoList Component

    Similar to before, the TodoList component fetches the to-do list and priorities from the external API. It uses the Authorization header with the bearer token to authenticate the request.

    // inside TodoList.tsx
    
    "use client";
    import { useState } from "react";
    import { useSession } from "next-auth/react";
    
    import {
      Select,
      SelectContent,
      SelectItem,
      SelectTrigger,
      SelectValue,
    } from "@/components/ui/select";
    import { Input } from "@/components/ui/input";
    import { Checkbox } from "@/components/ui/checkbox";
    import { Button } from "@/components/ui/button";
    
    import { Todo } from "@repo/todos";
    
    export default function TodoList({
      priorities,
      todos: initialTodos,
    }: {
      priorities: string[];
      todos: Todo[];
    }) {
      const [todos, setTodos] = useState<Todo[]>(initialTodos);
      const [priority, setPriority] = useState<string>(priorities[0]);
      const [title, setTitle] = useState<string>("");
    
      const { data: session } = useSession();
    
      const updateTodos = async () => {
        const res = await fetch("/rest/todos", {
          cache: "no-cache",
          headers: {
            Authorization: `Bearer ${session?.user?.token}`,
          },
        });
        setTodos(await res.json());
      };
    
      const onSubmit = async () => {
        await fetch("/rest/todo", {
          method: "POST",
          headers: {
            "Content-Type": "application/json",
            Authorization: `Bearer ${session?.user?.token}`,
          },
          body: JSON.stringify({
            title,
            priority,
            completed: false,
          }),
        });
        updateTodos();
      };
    
      const onSetCompleted = async (id: string, completed: boolean) => {
        await fetch(`/rest/todo/${id}`, {
          method: "PUT",
          headers: {
            "Content-Type": "application/json",
            Authorization: `Bearer ${session?.user?.token}`,
          },
          body: JSON.stringify({ completed }),
        });
        updateTodos();
      };
    
      const onDelete = async (id: string) => {
        await fetch(`/rest/todo/${id}`, {
          method: "DELETE",
          headers: {
            Authorization: `Bearer ${session?.user?.token}`,
          },
        });
        updateTodos();
      };
    
      return (
        <div className="mt-5">
          {todos && (
            <>
              <ul>
                {todos?.map((todo) => (
                  <li key={todo.id} className="flex gap-2 items-center mb-3">
                    <Checkbox
                      checked={todo.completed}
                      onClick={() => onSetCompleted(todo.id, !todo.completed)}
                    />
                    <div className="flex-grow">{todo.title}</div>
                    <Button variant="destructive" onClick={() => onDelete(todo.id)}>
                      Delete
                    </Button>
                  </li>
                ))}
              </ul>
            </>
          )}
          <div className="flex gap-2">
            <Select value={priority} onValueChange={(v) => setPriority(v)}>
              <SelectTrigger className="w-[180px]">
                <SelectValue placeholder="Priority" />
              </SelectTrigger>
              <SelectContent>
                {priorities.map((priority) => (
                  <SelectItem value={priority} key={priority}>
                    {priority}
                  </SelectItem>
                ))}
              </SelectContent>
            </Select>
            <Input
              placeholder="Todo"
              value={title}
              onChange={(evt) => setTitle(evt.target.value)}
            />
            <Button onClick={onSubmit}>Submit</Button>
          </div>
        </div>
      );
    }
    

    After each mutation (like adding or completing a to-do), we should revalidate the Next.js page to reflect the changes. To do this, we can use a webhook to trigger revalidation on the server.

    Webhook for Revalidation

    Over in api/callback/route.ts on our Next.js server, we define a route to handle the webhook:

    // inside api/callback/route.ts
    
    import { revalidatePath } from "next/cache";
    import { NextResponse } from "next/server";
    
    export async function POST(req: Request) {
      revalidatePath("/");
      return NextResponse.json({ success: true });
    }
    

    When our external API receives a change, it can trigger this webhook.

    This ensures the Next.js app always reflects the latest state from the API.

    Security Considerations

    It is important to note that this architecture method exposes the access token to the client-side JavaScript. This is in contrast to other examples we've looked at that use HTTP-only cookies that are not accessible to the client.

    A more secure approach would be to handle token-based communication entirely on the server side. In this setup, the client would talk to the Next.js server, then the Next.js server would have access to the Bearer token on the server. It would make the request, then send the data back to the client.

    Transcript

    This is the token variation of the external systems architecture. So the idea here is that the client is given a token as part of its session that it will then use to talk to the API REST token endpoints. That'd be a service token. This is the kind of thing that you get from third party APIs where you get a token and you're going to use that token. In this case, it is a user specific token to talk to the API REST endpoint to get those to-dos.

    And we're going to see how to take that token, put it into the session, get it out to the client, and get the client talking directly through a proxy in Next.js on slash rest. I'm talking a lot, let's go into the code and see how it works. The first thing we're gonna do is create a SlashRest proxy or rewrite in our Next.js server. So that means that the Next.js server is configured such that if you hit anything on SlashRest, anything else, it'll get sent to localhost 5002, which is API REST token with that path added on. It also includes all the cookies and everything else.

    So that's how the client is going to talk to the API REST token. Let's go take a look at the homepage code. So homepage is going to get our session, it's going to get our unauthenticated request back directly to that token endpoint to get the priorities. Then it's going to make the authenticated request back to that token API. Now to do that, it has to go and add on an authorization header.

    That authorization header says bearer and then the token. So where does that token get set? Well, that token gets set over in the NextAuth code. So if I look over here in index in our options for next auth down here when we have a callback for a session getting created in addition to setting the user id on the session we also set a token and that token is given to us from get user token which is defined over in our local auth repo. It's a very simple text token.

    It's not secure, but it's there to show how these tokens work. So now we've got our token on our session, so sessionUserToken, And over here in our page code, we can see that we are using session user token as the bearer token to talk to that backend server. Now, once we've got our to-dos and our priorities. We can then go and render the page. So that includes the off button to sign in and sign out.

    And then if we're logged in, we wrap our to-do list in a session provider. That session provider is gonna give us use session on the client. Use session is going to get us our token. We give the to-do list our list of to-dos as well as the priorities. Go take a look at our client code.

    We can see at the top here that we're getting use session from NextAuthReact. That's what we're going to use to get the session and inside the session is our token. Then we got our to-do list component definition. It takes as props the priorities as well as our initial set of to-dos, takes those initial set of to-dos and sets a local copy of that reference to the state, and then it's got the priority and the title that we're gonna use for adding a new to-do. Now to get that authorization token, we're gonna go and get the session data out of that useSessionHook.

    And then anytime that we do things like fetching REST TODOs, which is again, proxied through that Next.js server, we're gonna add on the authorization token using that bearer token. Then once we get the response back, we're gonna set our local copy of the to-dos to the data that we just got back. That's how we update the list of to-dos after we make a mutation. To make a mutation, for example in this case adding a to-do, we simply post to rest to-do, again that proxied through Next.js unbeknownst to our application code. And again, we're using our bearer token and our stringify body.

    Once that completes, we update the list of to-dos, which again, sends our bearer token. That's how that token gets through to that API REST token. The rest of this is just more mutations for clicking on the completion, handling a deletion, and then formatting the to-dos as well as all the inputs. Now, of course, once you made a mutation, we want to make sure the next JS is invalidated so that on the next request we get the most recent to-dos. To do that, we have a webhook.

    So over here under API callback, we've got a route. It handles a POST request, and in any POST request, we just revalidate the path. Now, the POST request actually does contain some biographic information from the REST server about what actually happened. The way that it does that is we look over here back at package.json. When you fire this external token example up, we specify a local environment variable, front-end server, and that is what the REST token API is going to look at when it posts a webhook.

    So over in the API REST token source server, we've got post webhook. It's going to look at that front end server environment variable, say, is there a front end server or is one registered that takes a webhook callback? If there is, we'll just run a post against that with an event and a payload. The event is going to tell us what happened and the payload is going to tell us a little bit more biographic information. To see how that actually works, down here in post to do, which is where we add a to do.

    When that succeeds, we do a to do added, and then we give it the new to do. That's going to post back to our front-end server. That front-end server is then going to revalidate the path, and there you go. Now, the issue with this particular token variant is that that access token is actually leaked to the client, meaning that that token is available in the JavaScript user space. In other examples that we've used in this section, we are using HTTP only cookies.

    So the cookie and any authorization in it is inaccessible to JavaScript on a client. Because we're using the session directly and we're creating and specifying the bearer tokens on the client, that access token is actually leaked out to the client. So that's something to think about when it comes to security using a system like this. This would all be far more secure if instead of the client talking directly to this REST endpoint, it would talk to the Next.js server, and the Next.js server would have access to that bearer token on the server, it would make requests to that API token endpoint, and then send back and send to the client. That would be a much more secure variant of this that would not rely on the client getting access to that access token.