Currently, there's no way to access any of the previous chats in our application. A great solution to this problem would be to create a list of previous chats at the top of the page.
Before we start implementing this feature, let's do some refactoring on our current code since there will be two different mechanisms for showing chats.
Creating a Transcript Component
In our existing Chat component, the messages section is a bit complex. Let's extract it into its own component so that we can reuse it between new chats and existing chats.
Create a new file components/Transcript.tsx, which will contain much of the existing messages section from the Chat component, along with some additional functionality.
This new Transcript component will receive a list of messages and a truncate option as props. The truncate option will be used to shorten the length of the message if it's too long:
// inside Transcript.tsx

import { Message } from "@/types";

const truncateText = (str: string, length: number) =>
  str.length > length ? str.slice(0, length) + "..." : str;

export default function Transcript({
  messages,
  truncate = true,
}: {
  messages: Message[];
  truncate?: boolean;
}) {
  return (
    <div className="flex flex-col gap-2">
      {messages.map((message, index) => (
        <div
          key={index}
          className={`flex flex-col ${
            message.role === "user" ? "items-end" : "items-start"
          }`}
        >
          <div
            className={`${
              message.role === "user" ? "bg-blue-500" : "bg-gray-500 text-black"
            } rounded-md py-2 px-8`}
          >
            {truncate ? truncateText(message.content, 200) : message.content}
          </div>
        </div>
      ))}
    </div>
  );
}
Updating the Chat Component
After creating the component, we can now import it into our Chat component along with the Message types:
// inside components/Chat.tsx

import Transcript from "./Transcript";
import { Message } from "@/types";
Inside of the Chat component's render method, we can replace the previous div that we used for displaying the chat transcript with the Transcript component:
// inside the Chat component
  return (
    <div className="flex flex-col">
      <Transcript messages={messages} truncate={false} />
      <div className="flex border-t-2 border-t-gray-500 pt-3 mt-3">
        <Input
          className="flex-grow text-xl"
          placeholder="Question"
          ...
For now, we'll have the truncate prop set to false since in the Chat component, we want to be able to see the full text of each message.
Creating a Previous Chats Component
Now let's move on to creating a PreviousChats component. This component will be responsible for displaying the chat history or previous conversations. It's a good way to keep track of the conversation flow and all the messages that have been exchanged.
Create a new file at components/PreviousChats.tsx. This is going to be a React Server Component, which is an asynchronous component that can perform database work or request backend services. It can then send the data to a client component to be displayed.
Remember, React Server Components and Client Components are both rendered on the server. The main difference is that React server components stop there. They only get rendered on the server. Client components get rendered in both places.
The PreviousChats component will first get the current user's session using the getServerSession function. Then, it will fetch the existing chat conversations that this user has participated in using the getChatsWithMessages function, passing in the user's email as an argument:
import { getServerSession } from "next-auth";
import { getChatsWithMessages } from "@/db";

export default async function PreviousChats() {
  const session = await getServerSession();
  const chats = await getChatsWithMessages(session?.user?.email!);
  ...
Now, we need to account for two different scenarios:
If the user hasn't participated in any chat conversations before, we'll display a message that says so. If the user does have previous chats, we want to display them in an easy-to-browse format. For each chat conversation, we'll wrap the transcript in a Link component that navigates to a detailed view of that chat.
We'll use a Transcript component that we built earlier to display the content of the chat.
To make the list of previous chats more appealing, we'll enclose each chat transcript into a box inside a grid. Each box will contain the chat's name and its transcript, and we'll add a separator between each chat.
Here's how PreviousChats looks like all together:
// inside PreviousChats.tsx
import { getServerSession } from "next-auth";
import Link from "next/link";

import { Separator } from "@/components/ui/separator";

import { getChatsWithMessages } from "@/db";

import Transcript from "./Transcript";

export default async function PreviousChats() {
  const session = await getServerSession();
  const chats = await getChatsWithMessages(session?.user?.email!);

  return (
    <div>
      {chats.length > 0 && (
        <>
          <div className="text-2xl font-bold">Previous Chat Sessions</div>
          <div className="grid grid-cols-1 md:grid-cols-2">
            {chats.map((chat) => (
              <div key={chat.id} className="m-1 border-2 rounded-xl">
                <Link
                  href={`/chats/${chat.id}`}
                  className="text-lg line-clamp-1 px-5 py-2 text-white bg-blue-900 rounded-t-lg"
                >
                  {chat.name}
                </Link>
                <div className="p-3">
                  <Transcript messages={chat.messages.slice(0, 2)} />
                </div>
              </div>
            ))}
          </div>
          <Separator className="mt-5" />
        </>
      )}

      {chats.length === 0 && (
        <div className="flex justify-center">
          <div className="text-gray-500 italic text-2xl">
            No previous chats.
          </div>
        </div>
      )}
    </div>
  );
}
And that's it! We've now completed a system for displaying previous chat sessions to the user. Based on the user's previous chats, our application can now either inform the user that they have no previous chats or display a nicely formatted list of their past conversations.
Now we can update the main home page to include the PreviousChats component. We'll also include the NewChatSession component so that the user can start a new chat session:
// inside app/page.tsx

// other imports as before
import PreviousChats from "@/components/PreviousChats";

export default async function Home() {
  const session = await getServerSession();

  return (
    <main className="p-5">
      <h1 className="text-4xl font-bold">Welcome To GPT Chat</h1>
      {!session?.user?.email && <div>You need to log in to use this chat.</div>}
      {session?.user?.email && (
        <>
          <PreviousChats />
          <h4 className="mt-5 text-2xl font-bold">New Chat Session</h4>
          <Separator className="my-5" />
          <Chat />
        </>
      )}
    </main>
  );
}
With this change, the previous chats will be displayed on the homepage:
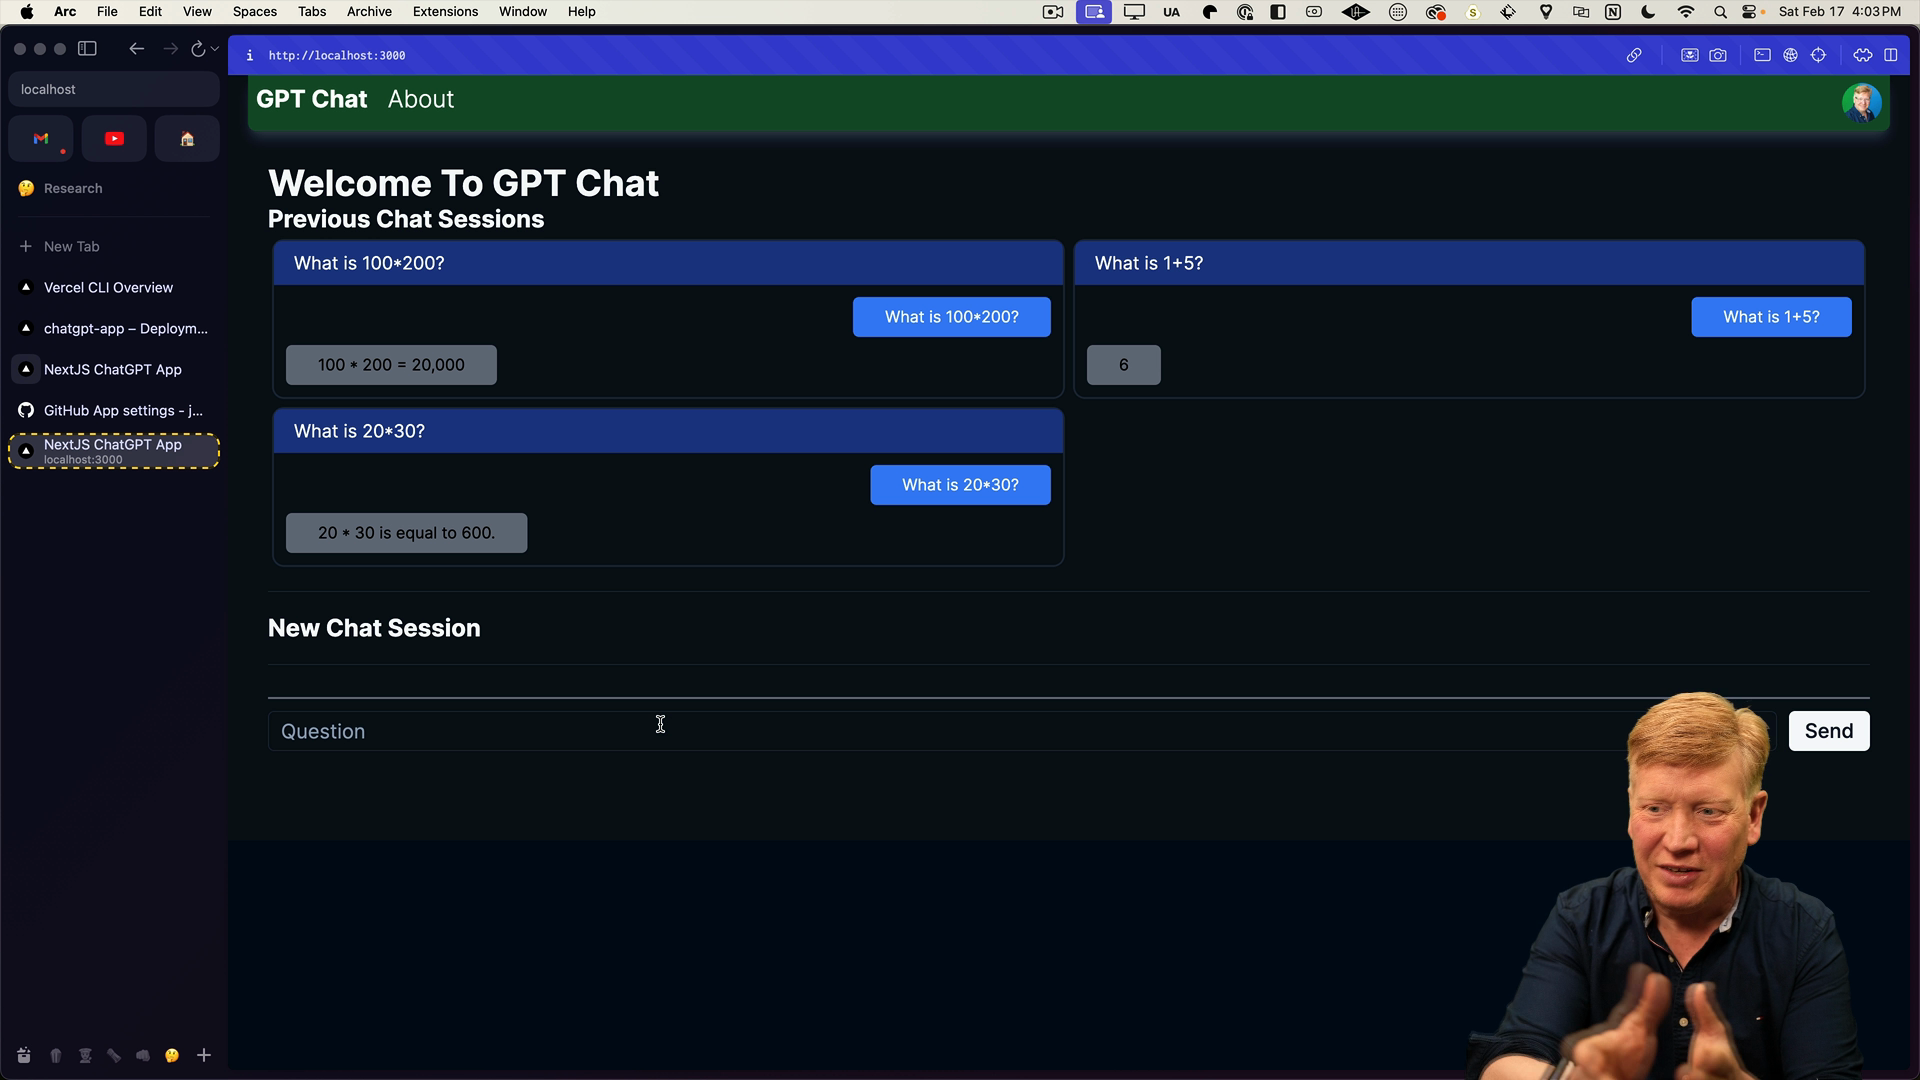
The homepage fetches a server session and once it identifies who you are, then the PreviousChats component independently reaches out to the database to retrieve existing chats with messages.
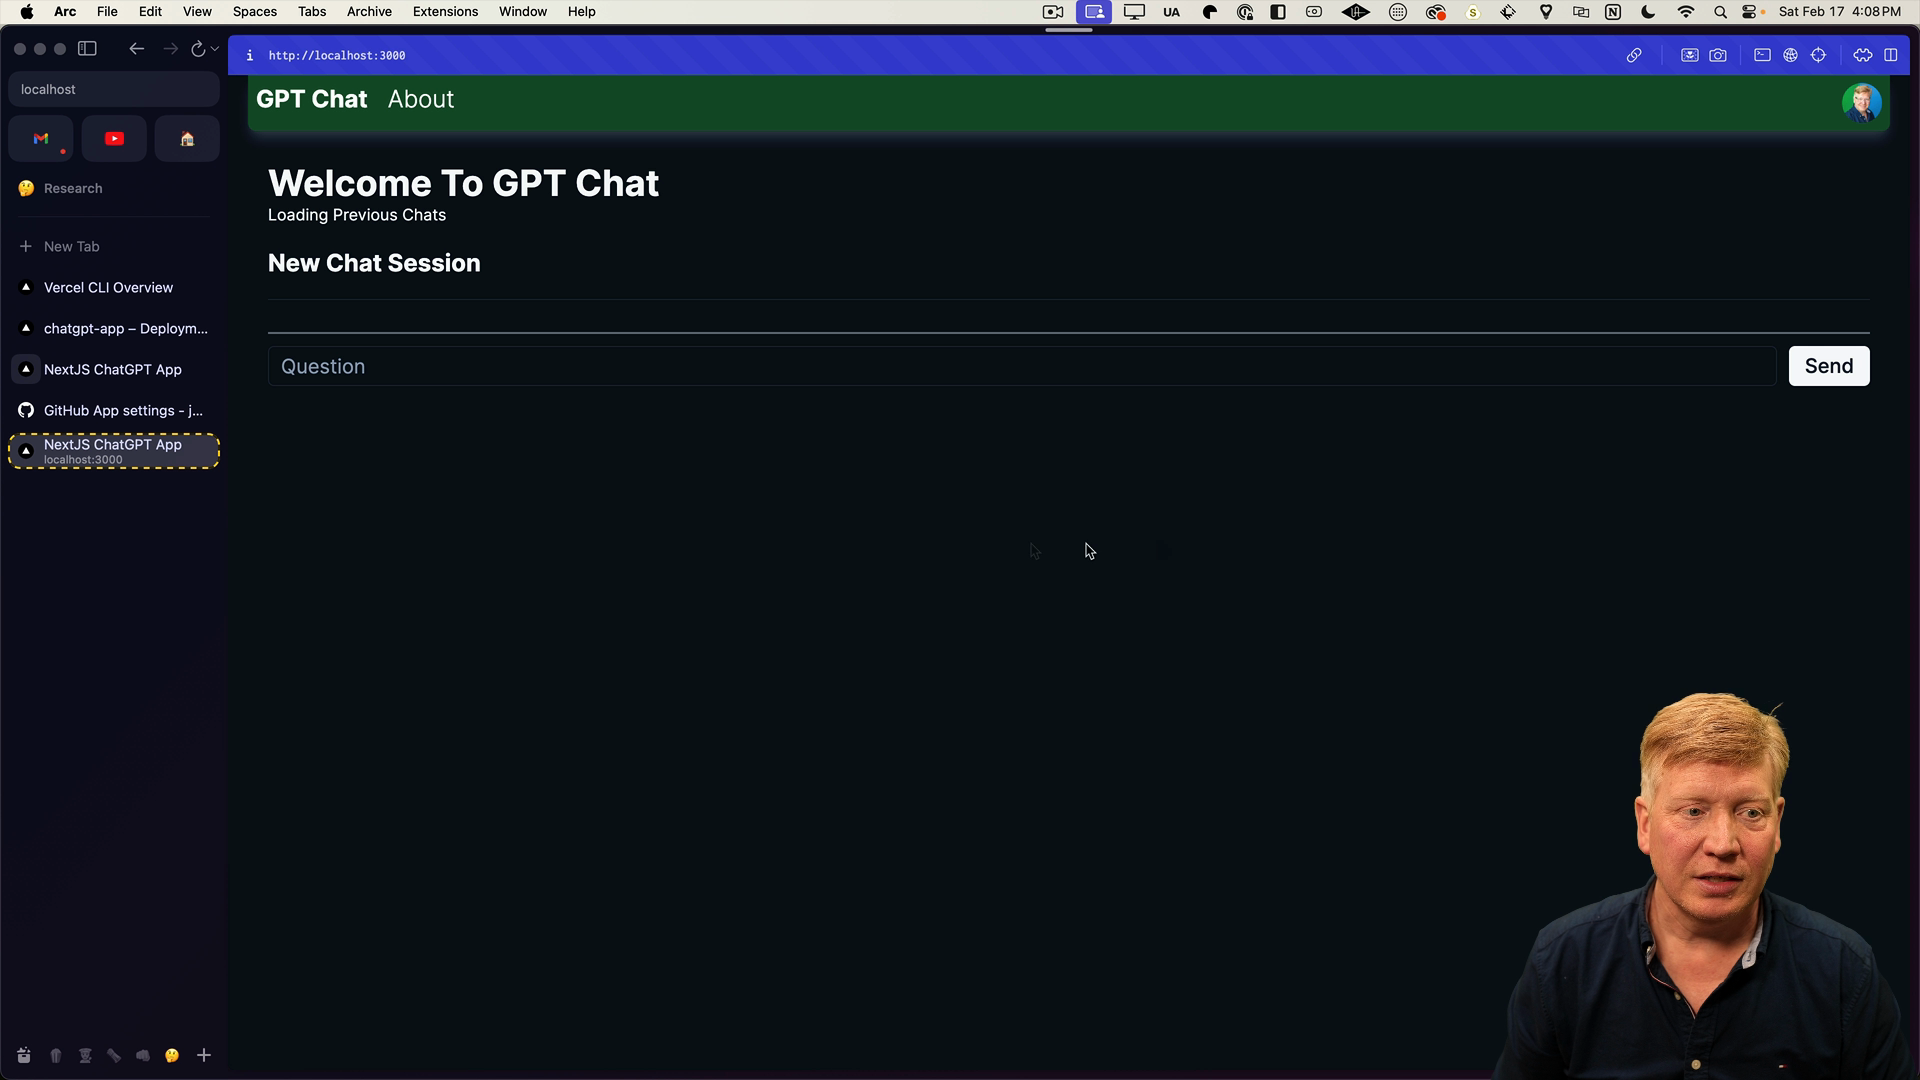
Handling Delays in Database Interaction
We know that the chats are loaded, but if there's a long delay the page will stay blank while the data is loading. This isn't the best user experience.
In order to add a loading message or other placeholder while the previous chats are being fetched, we can use Suspense.
To do this, import Suspense from React and then wrap PreviousChats in a Suspense component. This allows us to provide a fallback state, which we'll set to a "Loading previous chats" message:
// inside app/page.tsx

import { Suspense } from "react";
// other imports as before

// inside the Home component return

{session?.user?.email && (
  <>
    <Suspense fallback={<div>Loading Previous Chats</div>}>
      <PreviousChats />
    </Suspense>
    <h4 className="mt-5 text-2xl font-bold">New Chat Session</h4>
    <Separator className="my-5" />
    <Chat />
  </>
)}
Manually introducing a 3 second timeout to the PreviousChats component will show the "Loading previous chats" message on the homepage while the data is loading, while other UI components are ready to go and interactive.
Out-of-Order Streaming
The out-of-order streaming behavior provided by Suspense is incredibly powerful. Here's what happens:
When you request the homepage from a server, it sends back everything that isn't wrapped in Suspense first. It holds the connection open until all the Suspense boundaries are resolved. Then, it takes the output of the Suspense boundaries and streams it to the client. The client goes ahead and updates that content anywhere on the page based on its own schedule. This is why it's referred to as "out-of-order streaming".
It used to be that you would have to render the page and then pause if you had some promise-type request ongoing and then continue. You couldn't finish the HTML until the whole page was done. However, with out-of-order streaming, you can stream the whole page and change out parts of it using the Suspense system.
One of the biggest advantages of the App Router system over the Pages Router system comes down to managing laggy components. With the Pages Router system, it was far more involved. You'd have to bail out of getServerSideProps, make requests off the client, open up APIs, and so on. It required a lot of work, potentially opening up a host of security issues.
With App Router, it's as simple as adding a Suspense. It works wherever you need it, with minimal fuss.
Now, we'll just remove that timeout and we are all set to push the changes to production. The result is a more robust, efficient, and responsive webpage, providing a smoother user experience. Learning efficient ways to handle component loading with Suspense and understanding the concept of out-of-order streaming is quite powerful when building modern applications.
Next Step
In the next lesson, we'll be working with a feature exclusive to the App Router in Next.js. It's called Parallel Routes, and it certainly lives up to its hype!