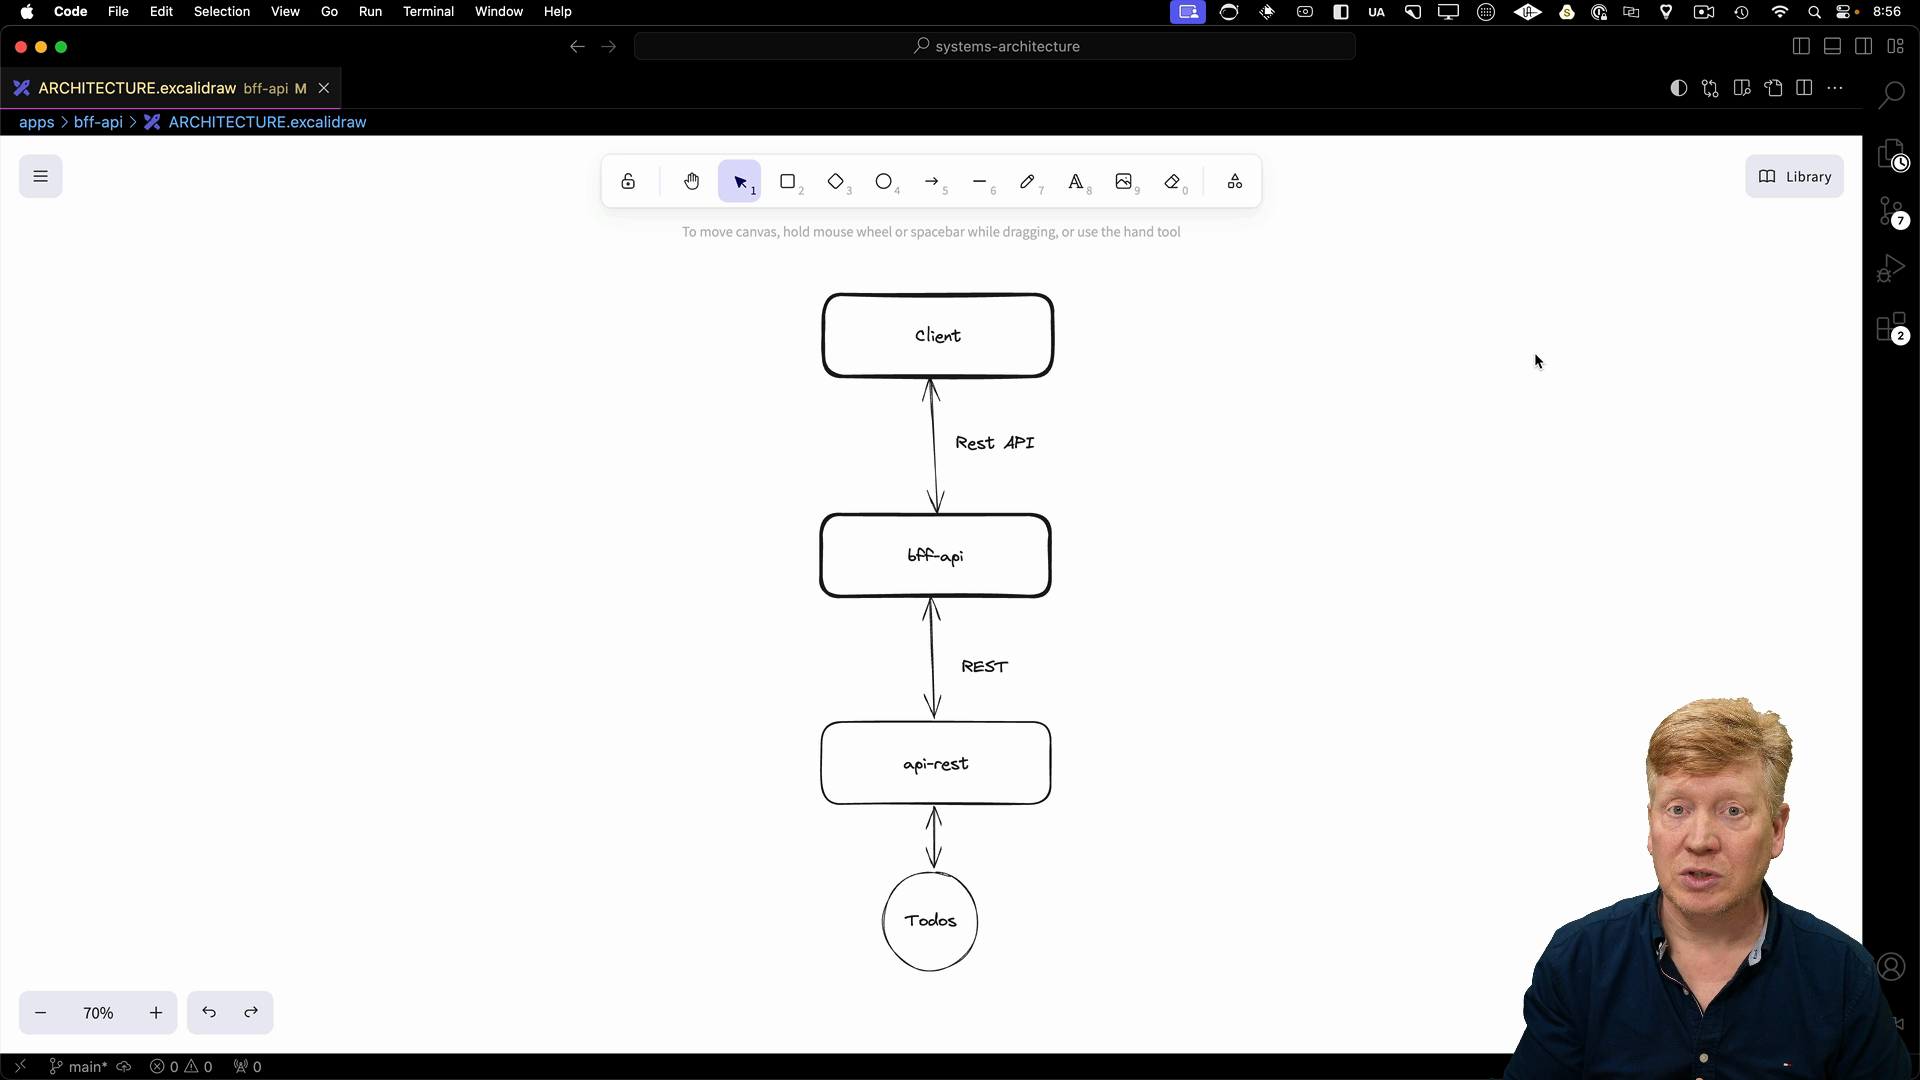
Let's look at the API variant of the BFF architecture, where the client uses a REST API located on the BFF API app to make mutations to their to-do list. The BFF API app, in turn, makes requests to the API REST microservice, which interacts with the To-Do's database.
This example app can be found in the apps/bff-api directory.
Code Implementation
Let's start with our homepage.
We'll first fetch the user's session. If there's no session, we redirect to the sign-in page. Otherwise, we fetch the priorities and to-dos for the user. This is done using the CallTodoService function:
// inside bff-api/src/app/page.tsx

import { auth } from "@/auth";
import { Todo } from "@repo/todos";

import AuthButton from "@/components/AuthButton.server";

import TodoList from "./TodoList";

import { callTodoService } from "@/todo-api";

export default async function Home() {
  const session = await auth();

  const priorities: string[] = await callTodoService("/priorities");

  const todos: Todo[] = session?.user?.id
    ? ((await callTodoService("/todos")) as Todo[])
    : [];

  return (
    <main>
      <AuthButton />
      {session?.user && <TodoList todos={todos} priorities={priorities} />}
    </main>
  );
}
callTodoService
The callTodoService function is inside the file apps/bff-api/src/todo-api.ts.
It is a simple wrapper for fetch. It gets the API server URL from the API_SERVER environment variable:
// inside bff-api/src/todo-api.ts

import { headers } from "next/headers";

const API_SERVER = process.env.API_SERVER;

export async function callTodoService(
  url: string,
  method: "GET" | "PUT" | "DELETE" | "POST" = "GET",
  body?: any
) {
  const req = await fetch(`${API_SERVER}${url}`, {
    method,
    headers: {
      Cookie: headers().get("Cookie")!,
      "Content-Type": "application/json",
    },
    body: body ? JSON.stringify(body) : undefined,
  });
  return await req.json();
}
The trick here is in the authorization. We take the cookie from the incoming request to the Next.js server and proxy it through to the API server. This allows the API REST server to know who it's talking to. It can use the same JWT decoding algorithm that's used by NextAuth to get the user ID out of the JWT.
Note that for these examples, we have removed the encryption part of NextAuth. You will not want to do that in production! This just makes it easier for us to have a Next.js application talking to an Express application and sharing the same JWT.
The TodoList Client Component
Now let's look at the client component at apps/bff-api/src/TodoList.tsx.
The Client component gets the list of priorities and to-dos. It keeps track of changes to the to-do list using state and interacts with the API to update, mark as complete, or delete to-dos.
"use client";
import { useState } from "react";
import {
  Select,
  SelectContent,
  SelectItem,
  SelectTrigger,
  SelectValue,
} from "@/components/ui/select";
import { Input } from "@/components/ui/input";
import { Checkbox } from "@/components/ui/checkbox";

import { Todo } from "@repo/todos";
import { Button } from "@/components/ui/button";

export default function TodoList({
  priorities,
  todos: initialTodos,
}: {
  priorities: string[];
  todos: Todo[];
}) {
  const [todos, setTodos] = useState<Todo[]>(initialTodos);
  const [priority, setPriority] = useState<string>(priorities[0]);
  const [title, setTitle] = useState<string>("");

  const updateTodos = async () => {
    const res = await fetch("/api/todos", {
      cache: "no-cache",
    });
    setTodos(await res.json());
  };

  const onSubmit = async () => {
    await fetch("/api/todo", {
      method: "POST",
      headers: {
        "Content-Type": "application/json",
      },
      body: JSON.stringify({
        title,
        priority,
        completed: false,
      }),
    });
    updateTodos();
  };

  const onSetCompleted = async (id: string, completed: boolean) => {
    await fetch(`/api/todo/${id}`, {
      method: "PUT",
      headers: {
        "Content-Type": "application/json",
      },
      body: JSON.stringify({ completed }),
    });
    updateTodos();
  };

  const onDelete = async (id: string) => {
    await fetch(`/api/todo/${id}`, {
      method: "DELETE",
    });
    updateTodos();
  };

  return (
    <div className="mt-5">
      {todos && (
        <>
          <ul>
            {todos?.map((todo) => (
              <li key={todo.id} className="flex gap-2 items-center mb-3">
                <Checkbox
                  checked={todo.completed}
                  onClick={() => onSetCompleted(todo.id, !todo.completed)}
                />
                <div className="flex-grow">{todo.title}</div>
                <Button variant="destructive" onClick={() => onDelete(todo.id)}>
                  Delete
                </Button>
              </li>
            ))}
          </ul>
        </>
      )}
      <div className="flex gap-2">
        <Select value={priority} onValueChange={(v) => setPriority(v)}>
          <SelectTrigger className="w-[180px]">
            <SelectValue placeholder="Priority" />
          </SelectTrigger>
          <SelectContent>
            {priorities.map((priority) => (
              <SelectItem value={priority} key={priority}>
                {priority}
              </SelectItem>
            ))}
          </SelectContent>
        </Select>
        <Input
          placeholder="Todo"
          value={title}
          onChange={(evt) => setTitle(evt.target.value)}
        />
        <Button onClick={onSubmit}>Submit</Button>
      </div>
    </div>
  );
}
API Routes
The api directory houses our API routes. The auth directory handles NextAuth authentication, while the todo and todos directories manage interactions with the To-Do microservice.
Getting To-Dos
Here's the api/todos route. It handles GET requests, fetches the authenticated user's to-dos using the CallTodoService, and returns them as JSON:
import { NextResponse } from "next/server";

import { callTodoService } from "@/todo-api";

export async function GET() {
  return NextResponse.json(await callTodoService("/todos"));
}
Mutation Handlers
Let's take a look at how to create a todo in api/todo/route.ts.
This route handles POST requests, extracts the to-do data from the request body, calls callTodoService to create the to-do in the microservice, and revalidates the / path to ensure the cache is updated:
import { revalidatePath } from "next/cache";
import { NextResponse } from "next/server";

import { callTodoService } from "@/todo-api";

export async function POST(req: Request) {
  const body = await req.json();
  const out = await callTodoService("/todo", "POST", body);
  revalidatePath("/");
  return NextResponse.json(out);
}
Inside the api/todo/[id]/route.ts route, we have routes for getting a single to-do, marking a to-do as complete, and deleting a to-do.
import { revalidatePath } from "next/cache";
import { NextResponse } from "next/server";

import { callTodoService } from "@/todo-api";

export async function GET(
  req: Request,
  { params: { id } }: { params: { id: string } }
) {
  return NextResponse.json(await callTodoService(`/todo/${id}`));
}

export async function PUT(
  req: Request,
  { params: { id } }: { params: { id: string } }
) {
  const body = await req.json();
  const out = await callTodoService(`/todo/${id}`, "PUT", body);
  revalidatePath("/");
  return NextResponse.json(out);
}

export async function DELETE(
  req: Request,
  { params: { id } }: { params: { id: string } }
) {
  const out = await callTodoService(`/todo/${id}`, "DELETE");
  revalidatePath("/");
  return NextResponse.json(out);
}
When to Use the BFF API Pattern
This BFF pattern is especially beneficial if you have other clients besides your web app, like mobile apps, desktop apps, or CLIs, that need to interact with your API. This pattern provides a dedicated layer for each client type.